Essential Pi: Tips for Getting the Most Out of Your Raspberry Pi
Check out the Raspberry Pi TechXchange for more articles about Raspberry Pi.
What you’ll learn:
- How to leverage tips and advice from Newark and the element14 Community to get the most out of your Raspberry Pi.
Although Raspberry Pi wasn’t the first single-board computer on the market, none have enjoyed the same widespread success. Alternatives to the Raspberry Pi may have faster CPU speeds, more IO, or specialized on-board peripherals, but none of them have that “just right” combination of price, support, power, and features.
The Raspberry Pi has evolved from a tool for students and hobbyists to a viable option for certain types of engineering projects in the form of the Compute Module, and most recently the Raspberry Pi Pico. The latter brings Raspberry Pi’s signature values of high performance, low cost, and ease of use to the microcontroller market in a game-changing $4 development kit.
If you’re considering the Raspberry Pi simply due to curiosity about electronics and coding, or even if you’re a practicing engineer, just go for it. The size of the community and the sheer number of publicly available forums tutorials and projects means than you will be in good company as you explore and experiment.
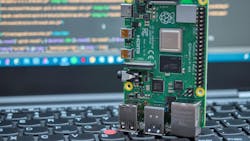
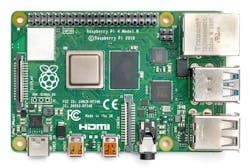
But while the Raspberry Pi might possess that “just right” feel of functionality, it also has its eccentricities and idiosyncrasies like anything else. Focusing on Raspberry Pi’s traditional offering—the latest of which is the Raspberry Pi 4—the following tips can help you overcome some of the vulnerabilities and limitations when inventing with the Pi (Fig. 1).
The Need for Power
Because Raspberry Pi doesn’t come with on-board power supplies, you will have to provide one. As a rule of thumb, consider a higher milliamp (mA) rating than necessary. The additional amperage may keep your Raspberry Pi from resetting when you start adding accessories and external circuitry.
Even if your configuration doesn’t overload the circuit, an insufficient power supply may inadvertently hurt your Raspberry Pi’s performance or corrupt the SD card. If the supply voltage dips or the unit overheats, the GPU in the Raspberry Pi will throttle the CPU speed down.
Overcoming Storage Limitations
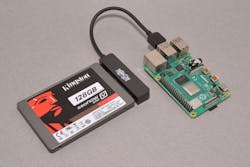
Raspberry Pi doesn’t have a hard drive, but this limitation is actually pretty easy to overcome. You can connect the Raspberry Pi to an NAS unit via the Ethernet port or Wi-Fi, or connect an external drive via one of the USB ports with a USB-to-SATA adapter (Fig. 2).
Keep in mind that connecting external storage to the Raspberry Pi isn’t just a novelty—it’s insurance. As you experiment with Raspberry Pi, you will inevitably corrupt your SD card. It’s good practice to store anything important somewhere other than the SD card.
Telling Time
Raspberry Pis can’t tell time by themselves because they don’t come with a real-time clock (RTC) or analog-to-digital converter (ADC). Also, the GPIO pins on the board operate at 3.3 V dc, whereas most accessories you might want to use with the Raspberry Pi operate at 5 V dc. Fortunately, RTC, ADC, and 3.3- to 5-V converter modules are inexpensive and easily obtained devices.
If your time-telling requirements aren’t terribly stringent, an alternative may be simply setting up the Raspberry Pi to check the time via a Wi-Fi, Ethernet, or Bluetooth connection.
Switching Inductive Loads
Like most digital electronics, Raspberry Pis are susceptible to the electromagnetic interference (EMI) and back electromotive force (EMF) that comes from switching inductive loads. Some examples of these interference culprits include solenoid valves, relays, contactors, and motors. A Raspberry Pi may even reset or lock up just by being situated too close to a solenoid valve or a beefy relay.
To avoid this interference and the potential damage it causes, always isolate your Raspberry Pi from inductive loads with a Pi HAT (hardware attached on top, a hardware specification made for Raspberry Pi) designed for this purpose, or an optoisolator.
Another good rule is to avoid powering inductive loads from a Raspberry Pi’s power supply. The amount of trouble an inductor will give you will be roughly proportional to its physical size. In some cases, you may find that you will need quite a bit of physical separation between the Raspberry Pi and the inductor. In cases where this separation isn’t an option, consider employing a snubbing circuit of some sort, like a diode in parallel with the relay coil or an RC snubber on a dc motor.
Hitting Reset
Unlike a desktop computer, when something goes awry, a Raspberry Pi user can’t simply Ctrl+Alt+Delete to reset it out of a halted state. Yet it’s inevitable that you will lock up your Raspberry Pi at some point during your experimentation.
Usually this isn’t a big deal, and you have a few ways of dealing with it. For one, you can power cycle your Raspberry Pi by unplugging the power supply from it, but this can get pretty tedious.
A better option is to get a power cable with an integrated On/Off switch, or purchase a USB pass-through board with a switch on it. If you have a Raspberry Pi 4, another option is to reset the Pi’s SoC by connecting the Global_ EN pin to a ground.
Utilize LEDs to Take Control
When writing code that controls the hardware on the Raspberry Pi, start by blinking an LED. It doesn’t matter if you’re attempting to control the GPIO pins on the Raspberry Pi itself, or some aspect of a Pi HAT or accessory board. When you can blink an LED at exactly the rate you want, then you have begun to exert a measure of control over that hardware. Blinking an LED is the “Hello World” of hardware programming.
LEDs can also be used as a kind of physical breakpoint in your code, by setting one up to blink or activate when a program hits certain points or thresholds. This isn’t always possible due to the nature of a project, but when circumstances allow it, an LED is a dead simple diagnostic tool.
Creative Graphics
Python is the preferred programming language for the Raspberry Pi. Shortly after you start writing Python code, you’re going to want to make your own custom GUIs. Tkinter is the de facto GUI package for Python, as stated right at the top of its Wiki page. Unfortunately, Tkinter isn’t documented very well in any one place. To learn it, you will have to spend time combing the internet and pooling information from multiple sources.
Tkinter can be a little overwhelming or even frustrating for newer users. It may be easier to look at Guizero, a library for Python 3 that’s perhaps the fastest and easiest way to make a GUI in Python.
Final Thoughts
The ease of use of the Raspberry Pi is what makes it so attractive to makers, engineers, and designers when choosing a development board. But with that ease comes some functionality and configuration tradeoffs.
The good news is that the broader Raspberry Pi community has figured out solutions to most of these limitations. By leveraging the abundance of tips and advice from the community, you can gain a solid understanding of the coding and electronics needs of your solution.
If you’re looking for more information and additional tips for troubleshooting the Raspberry Pi, download this helpful eBook from the element14 community.
About the Author
Phil Hutchinson
Senior Specialist Community Programs, element14, An Avnet Community
Phil is an element14 community Senior Project Specialist and a Raspberry Pi and BBC micro:bit program manager.


