As the name suggests, Geotest’s ATEasy software is intended to be used for ATE program development. How ever, functional test applications are only one type of program that could be developed with ATEasy.
Many instrument drivers, a built-in test executive, and a large internal library are provided with the package. The integrated development environment (IDE) includes tools that allow you to create virtually any type of driver using serial communications, IEEE 488 (GPIB), WinSocket, dynamic data exchange (DDE), dynamic link libraries (DLLs), and ActiveX I/O.
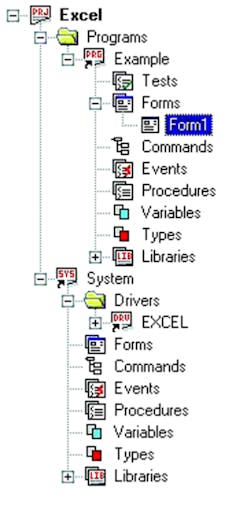
A partially expanded workspace tree for an Excel example program shows some of the program’s submodules (Figure 1). Selecting an element in this view brings up a separate window where you can see the item and specify details such as local variables and procedures.
For first-time users, it may be confusing to have many objects with similar names displayed in the tree view. However, after you are more familiar with the relationship between the modules and submodules, this tree becomes the main tool for locating and opening objects for editing.
Clicking on a module in this view opens a window divided into separate tree and object views. This new tree view displays a much smaller list of objects related only to this module.
Objects in a submodule, such as procedures, can be defined as public or local. Defining them as public allows other modules to use them. For example, a public driver procedure can be accessed from the program test submodule.
Getting Started With ATEasy is the title of the 170-page introductory manual that I downloaded before attempting to develop an ATEasy application. The actual 20-MB Version 4.0 program took about 25 minutes to download using a shared DSL connection. Installation was straightforward, and in less than an hour, I was ready to go.
The getting-started part of the title is particularly relevant. ATEasy, like many Visual Basic-based programs, is deceptively simple in appearance. And, it is true that you can build applications quickly with a few buttons and a display.
The daunting aspect of ATEasy is the extensive and accessible structure underlying the basic project, program, and system modules. Geotest recommends a three-day training course before developing applications; however, the package was designed for self-learning, and the manual has a step-by-step tutorial for most common tasks.
Application development is supported by trace and breakpoint capabilities as well as a large selection of detailed example routines. When you’ve completed debugging an application, the Build facility can be used to generate a royalty-free, stand-alone, executable version of your program that doesn’t require ATEasy to run.
An Example
Because I was not using ATEasy with actual instruments, accessing data in Excel files that I had prepared earlier seemed like a good alternative. The first step was to add the Excel type library under the libraries submodule. ATEasy uses either DLLs or ActiveX or component object module (COM) type libraries. You have to define the contained programming elements to use DLLs, but type libraries already have complete definitions.
ATEasy operations are uniform both in the way they work and how they’re presented. Adding a library is no exception. Right-clicking on a module brings up a short menu that includes the option Insert Object Below.
This general wording is used throughout the manual, but the actual menus in V4.0 name the specific object. For example, in this case, right-clicking presents a menu that includes Insert TypeLib/DLL Below. Selecting this action results in the display of a long list of available libraries, the relevant libraries that currently are installed on your computer. I had been using Excel for several years before installing ATEasy, so one of the choices in the list was the required Microsoft Excel 9.0 Object Library.
The Excel library includes classes that, in turn, comprise methods and properties. I needed the Application class. I added a variable called xlapp, again by right-clicking on the program-variables submodule, and selecting Insert Variable Below. Right-clicking on the newly created variable opened a properties page where xlapp could be declared to be of type Excel.Application and zero dimension.
Similar properties pages apply to other supported data types such as numerical variables that you would declare to be double, short, or Boolean, for example, and to string variables. Via the up/down arrows adjacent the dimension text box, you can select the number of dimensions required for an array. Initial values also can be specified for variables.
The Excel example in the ATEasy Examples folder opened a new workbook and a new window in which to display the active worksheet, prepared a table of hypothetical sales data for five sales areas, and wrote the data to the cells. Close, but not exactly what I wanted to do.
At this point, I had a couple of questions about other examples I tried as well as about opening an existing Excel workbook. So I called Geotest.
The technical support people were very helpful. My first question was about the odd operation of a plot routine. In an earlier example from the manual, different data was supposed to be generated and displayed each time a button was pushed, but my display only showed a new waveform after the first button push. Successive clicking on the button didn’t change the appearance of the display.
I had found, by trial and error, that inserting a chtData.clear statement ahead of the chtData.set instruction solved the problem. The support people told me that the chtData.set procedure actually included several more optional parameters; the last one cleared the display before plotting.
Providing sufficient commas in the chtData.set argument list to represent the options that were irrelevant to my routine and setting the display clear option True allowed the program to work without the added chtData.clear statements: chtData.set (“Plot number”, data source,,,, TRUE).
The support people made a very useful suggestion when I asked about accessing an existing Excel file. I was told to look at the several example programs included with ATEasy. In fact, I used an Excel example as the starting point for the program I wrote for this article.
My program combined the Excel example with a simple form developed as part of an exercise from the manual. Within the Form1 submodule I added is yet another set of events, procedures, variables, and subroutines specifically for each of the elements of the form. There are separate subroutines for each of the buttons: btnStart (Reference), btnAcquire, bntMatch, btnClose.
The code for the btnStart routine is shown in Figure 2 (below). Left-clicking on the form’s Reference button opens the only worksheet in the tom.xls Excel file, transfers its contents to an array ad1[ ], displays the data as a graph, and closes the file. The xlapp.Visible=FALSE statement means that no window is created for the spreadsheet. During debugging, the worksheet caption showed that the data really was coming from the intended Excel source.
Figure 2
sFileName_1=”C:\MSOFFICE\My Documents\tom.xls”xlapp=CreateObject(“Excel.Application”)
xlapp.Visible=FALSE
xlapp.Caption=”ATEasy Excel Read Demo by Tom”
xlapp.Workbooks.Open(sFileName_1)
for i=1 to 201 do
ad1[i-1]=xlapp.Cells.Item(i,1)
next
chtData.SetData(“Plot1”,ad1,,,,TRUE)
xlapp.Workbooks.Close()
Had I been using a driver provided by Geotest and a real instrument, I would have found features such as automatic code completion more useful. As it was, I had to recollect long-unused C programming skills, such as using pairs of forward slashes within a text string when identifying a path name.
The built-in help pages cleared up a few more questions. For example, why must the name of the file being opened be declared as a variable of type BString? The Help pages state the following: “BString is an OLE string that is also used as the only way to send or receive data from COM objects outside of ATEasy.” An Excel workbook is a COM object. However, I found out more recently from the support people that ATEasy will automatically convert a simple String variable to a BString where required.
Being able to increment the addresses of the individual spreadsheet cells via a Do loop was a novelty. This is a function that can be accomplished within Excel only with great difficulty unless such a loop already is part of a canned Excel routine. From ATEasy, it was as simple as the code appears. However, this operation initially failed because I had not correctly declared the type of the Item array as variant.
I also had trouble getting the Geotest Excel example to run at all. Again, it was a small thing, but the problem was caused by a handle variable within an error-checking routine. I solved the problem by deleting the error-checking code. The example then ran as intended, and I could determine the effect of some of the instructions.
Form1 could have been opened in a number of ways to start the program, but I chose to place the Load frmForm1, TRUE code in the Events submodule under the main program. Form1 is loaded OnInit, that is, upon program initialization. Figure 3a shows the form at initialization. Figure 3b displays the form after clicking on the Reference button, causing data from tom.xls to be copied and plotted.
Left-clicking on the Acquire button causes a sine wave to be generated and plotted. The number of cycles displayed corresponds to the number of times the button is pressed. Figure 3c shows this sine wave and the tom.xls data. I deliberately created a notch on the Excel data to distinguish it from the generated sine wave.
The third button, Match, calculates the standard deviation of the difference between the reference and generated curves. Clicking on the button also calls a procedure that adjusts the frequency of the sine wave in an attempt to find the best match to the plotted Excel worksheet data, similar to the type of routine you might write to accomplish data analysis.
Clicking on the Acquire button three times, then a few times on the Match button produced the result shown in Figure 3d. The two waveforms are closely aligned, and the standard deviation is near a minimum. However, the matching routine is not a general-purpose application and depends on the existence of a single minimum standard deviation toward which to drive. For example, it will not work for two or four Acquire button clicks. A local minimum will be found, but the best match between the two sets of data will not be. Clicking on Close unloads the form.
Summary
The purpose of writing an example program was to gain some familiarity with ATEasy. It is certainly the case that relatively powerful applications can be quickly created by using an IDE with a familiar Microsoft Visual Studio user interface and a programming language similar to Visual Basic. It’s also true that if you are an experienced programmer, ATEasy will probably appeal to you because of its flexibility.
I’ve learned enough to appreciate what it can do, but I’m by no means in a position to critique its performance. Starting from the framework provided, it was easy to write the required procedures for each of the buttons associated with Form1. I used a few local variables, but others were made available from the variables submodule within the program. Although my completed example performs correctly, in a real application with multiple forms, taking a more disciplined approach to variable naming and location would be important.
If you’re looking for a test-program development environment, why not try ATEasy yourself? It’s relatively small at about 20 MB, so if you have a DSL connection, download is quick. And, the best part, a 30-day trial of the complete program is free.
FOR MORE INFORMATION
on ATEasy enter this rsleads URL
www.rsleads.com/304ee-181
Return to EE Home Page
Published by EE-Evaluation Engineering
All contents © 2003 Nelson Publishing Inc.
No reprint, distribution, or reuse in any medium is permitted
without the express written consent of the publisher.
April 2003

