As IC devices get smaller and smaller, the challenge of detecting faults becomes bigger and bigger.
Tamar Technology designs and manufactures application-specific automated visual inspection and metro-logy systems for the semiconductor, micro-electromechnical systems (MEMS), data storage, micro display, and medical devices industries. Many of these, including wafer inspection, wafer flatness, optical line-width measurement, and magnetic disk drive head inspection systems and high aspect-ratio trench profilers, are installed in high-volume manufacturing environments located around the world.
In developing these technologies, Tamar has become a longtime user of various imaging hardware and software products from Matrox Imaging. One of these products is the Matrox Imaging Library (MIL), which contains a set of flexible image-acquisition, image-processing, and image-analysis functions for machine vision software developers.
Tamar Technology supplies a wide variety of machine vision solutions, from simple gauging products to the most demanding automated visual inspection systems. The company also has successfully upgraded longtime customers in production floor environments running 24/7 with newer versions of Matrox hardware and software, even after the systems have been deployed in the field for years.
Today, machine vision engineers do not need to develop low-level image-processing functions such as image smoothing, image sharpening, edge extraction, pattern recognition, and blob analysis. Instead, they can concentrate on developing high-level machine vision modules that further enhance the performance and robustness of a vision system.
Wafer Inspection
As electronics applications shrink in size, IC packaged devices must be reduced in footprint and thickness. The current chip thickness of about 100 �m for volume production is expected to decrease to about 50 �m in the near future and 20 �m within the next decade.
In response to these continuing industry needs, Tamar engineers are pioneering many application-specific defect detection and classification algorithms for the electronics industry. Many of these algorithms perform well even in degraded lighting conditions or high part-to-part variations.
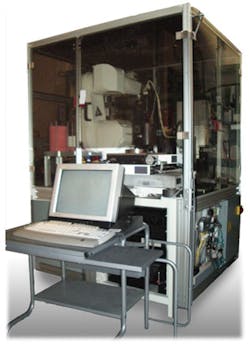
Tamar�s high-level machine vision modules are built on the MIL�s image processing and image analysis software functions to inspect defects on ultrathin wafers. For example, working with a major semiconductor manufacturer in the United States, Tamar has developed and deployed a wafer defect detection system for inspecting macro defects of 5 �m on ultrathin patterned wafers for post-fab use (Figure 1). In addition to a vision system for defect inspection, this machine contains a wafer handler, an inker, and an OCR reader.
To achieve production throughput for inline, high-volume semiconductor manufacturing, the ultrathin wafer inspection system consists of a server-quality computer with multiple processors. The computer uses a Matrox Odyssey XCL Vision Processor as an image-preprocessing front end.
In addition to the onboard processor, a pixel accelerator enhances processing time for compute-intensive image-processing applications. It performs neighborhood, point-to-point, and lookup table-based image processing operations.
While the machine is scanning the wafer, images are acquired from a high-resolution digital camera and stored in the onboard memory of the Odyssey XCL. They are concurrently preprocessed by the MIL image-processing functions to remove unwanted noise and enhance objects of interest.
When a desired output image is achieved, the inspection system aligns it to a model image generated on the fly. Because an image might contain one or more die patterns, the vision system must locate all the dice in the image. This is easily done by the pattern-recognition function and the geometric model finder function in the MIL.
The final step is detecting and classifying the defects that are found. The MIL provides functions to perform image arithmetic such as computing image differences and defect features so that defects can be classified and measured. All of these steps actually occur in parallel in a multithreading environment.
Magnetic Disk Drive Inspection
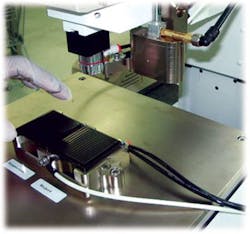
Another demanding automated application is inspecting a magnetic disk drive head for surface defects (Figure 2). Today�s small form factor disk drive easily fits in a cell phone, portable musical device, or gaming console. As a result, the disk drive heads can be as small as 0.033? � 0.028?.
Defects such as chips, cracks, and contamination are not allowed on a disk drive head. Some of these defects can be as small as 0.000060?.
A major U.S magnetic disk drive maker, with a manufacturing plant in South East Asia, currently is using an automated inspection system from Tamar Technology to inspect disk drive heads. For this manufacturer, which currently produces close to a million disk drive heads per day in a 24/7 production environment, throughput of the inspection system, a high defect capturing rate, and defect detection accuracy are extremely important.
The Tamar system, which inspects disk drive heads in a waffle pack, must automatically step through all the pockets on the waffle pack, capturing and finding each magnetic disk head in the image. Since the head can be sitting at a �20-degree rotational angle, finding and aligning the disk drive head must be the first step. The magnetic disk drive head inspection system also performs concurrent processing: image acquisition, image preprocessing, defect detection, and classification in parallel.
Several technical challenges of inspecting magnetic disk drive heads in a waffle pack must be overcome:
� Finding the magnetic disk drive head in the image and aligning the head with a model previously taught to the system must be done with subpixel accuracy. Magnetic disk drive heads are diced and sliced from a row bar into a rectangular shape, but the tolerance of the slicing operation could be too loose to match the outline of the head being inspected against the model. A more advanced algorithm that aligns the magnetic disk drive head based on the masking pattern is required.
� Certain areas on the magnetic disk drive head are allowed to have a wide tolerance of surface roughness. These areas can appear extremely dark to extremely bright under the same light intensity.
� The surface of the head can be quite grainy, making a simple intensity-based defect detection method less sensitive, particularly as defect size decreases.
� The magnetic disk drive head inspection software must detect chips and cracks at the edge of the head.
� The software must be intelligent enough to reject heads with killer defects and accept removable nonkiller defects. This is important because an excessive number of false rejects, which will have to be reviewed later by human operators, can affect production throughput and efficiency.
The problem of finding the location and rotation of the magnetic disk drive head within the image is overcome by a multistep pattern-recognition process that combines morphological operation, blob analysis, and normalized correlation. The first alignment step uses the rectangular shape of the disk drive head to determine the coarse location and rotation within the image. This is easily done by intensity segmentation once the proper threshold is determined.
The second alignment step, using pattern recognition, registers the image of the magnetic disk drive head to the model disk drive head image in subpixel accuracy. This is accomplished by aligning multiple unique features of the masking pattern on the magnetic disk drive head surface.
The problem of high-intensity variation of certain areas on the magnetic disk drive heads is solved by computing defect-detection thresholds dynamically. Using the model image as a reference, regions on the magnetic disk drive head surface with similar gray levels can be identified and labeled, and image statistics can be computed for each of these surfaces.
A simple defect detection method based on intensity thresholds is not adequate for detecting defects on grainy surfaces because the threshold has to be set loose enough to avoid detecting the grain on the surface as defective. By doing so, defect-detection sensitivity is compromised. A more advanced method of analyzing images using different parameters such as edge distribution, localized contrast, or pixel neighborhood gray-level difference can be used.
A set of defect classification rules is input to the inspection system. These classification rules, which try to mimic a human operator on differentiating killer defects from nonkiller defects, are created while working together with process engineers and inspection operators. The defect classification rules use defect features such as size, shape, and intensity data to classify defects.
The automated magnetic disk head inspection system also contains a real-time tracking mechanism to maintain focus while stepping from head to head. A pick-and-place mechanism requested by the customer also is integrated into the machine to remove rejected magnetic disk drive heads from the inspection waffle pack to a reject tray.
About the Author
Steven Chan is the vice president of Software Engineering of Tamar Technology. He has more than 10 years experience with machine vision and image analysis and holds a B.S. in computer science, an M.S. in industrial engineering, and an M.B.A. Tamar Technology, 996 Lawrence Dr., #202, Newbury Park, CA 91320, 805-480-3358, e-mail: [email protected]
FOR MORE INFORMATION
on Tamar inspection systems
www.rsleads.com/508ee-207
on the Matrox Imaging Library
www.rsleads.com/508ee-208


