What's All This Current Limiter Stuff, Anyhow?

This article is in Bob Pease on Analog Vol. 1 in the Analog section of the Electronic Design Library.
Members can download the PDF ebook.
The other day I was studying a current limiter using a basic current regulator, which used an old LM317LZ (Fig. 1).

I did the design on this IC about 20 years ago, with a little advice from Bob Dobkin. The LM317 was trying to force 40 mA into a white light-emitting diode (LED), so that 1.25 V across RS, the 30.1-ohms sense resistor, would cause a 41-mA current to flow—if you had enough voltage. (This is a GOOD standard application shown in every LM317 data sheet.) Because the output pin is 1.25 V above the adjust pin, the current I = 1.25 V/RS will flow—if there's enough voltage.
It worked fine with an input voltage of 9 V, or 8 V. But, of course, when it hit 7.4 V, it began dropping out of regulation. This was the basic design for a flashlight, using a white LED and a 9-V battery. The flashlight would run with RS = 30 ohms for a BRIGHT output, or 120 ohms for long battery life, and still provide enough light to hike with on a trail in the pitch dark.
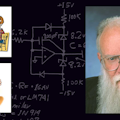
Then a few days later, I realized—I could do a lot better than that! Yes, an adjustable current source, such as an LM334N, might do a tiny bit better than an LM317. But see Figure 2.

The LM334N can regulate with not 1.25 V across the sense resistor—but just 64 mV. So a 1.6-ohms resistor will let you source 40 mA quite handily. And the voltage across the load does NOT have 0.7 V in series with it, so it regulates down MUCH better than Figure 1.
How much voltage is across the transistor? An ordinary 2N3906 will keep working down to 65 mV. So you can force 40 mA into a white LED that runs at 4.0 V, even down to a 4.13-V battery voltage. If you want to put 20 mA into a series stack of red LEDs, the conventional LM317 scheme will light two LEDs with a battery down to 6.3 V. But the LM334 scheme can drive three LEDs in series, with the same voltage. So it's not a bad circuit. This is a useful trick, especially if you have a load that's floating, and isn't grounded to either supply.
THIS circuit doesn't have a low tempco. Its output current increases at +0.33%/°C. But that's plenty good enough for many cases—like in a flashlight! If you need a better tempco than that, we know several ways to do it. Still, this will let you regulate the current into a red LED down to 2.1 V of supply voltage, or a white one down to 4.2 V—MUCH better than 7.4 V.
OH—I almost forgot to say—the LM334 sometimes needs a series RC damper. My first guess was 2 µF and 22 ohms across the base-emitter of the PNP. Actually, this circuit didn't oscillate or ring badly without an added capacitor, but the noise was a bit quieter when I added a 2- or 10-µF electrolytic.
If you really want a low tempco, use copper wire (magnet wire) for the resistor—that will cancel out nicely. You'll need 6 ft. of #34 gauge, or 10 ft. of #32.
Even if you did have a grounded load, this circuit would regulate down to 5.4 V—considerably better than 7.4 V.

I told the guy, "This will probably work, but the FET has to be a big one, such as an IRF640 or IRF740, with a large heat sink, as it will have to handle 30 W. And the current limit isn't perfectly constant, or well defined, as the current limiter gets smaller at warm temperatures. I don't know if that's what you want, but that's what you get. Tell me if that's unacceptable. And if you nail the output with a short-circuit load, it will probably blow out."
Later, I thought about this circuit. Would it be possible to design in some improvements, to avoid some of these disadvantages?

The temperature coefficient problem gets solved next. The VBE shrinks at 0.3%/°C in Figure 3. But the improved circuit of Figure 4 gets a better tempco of the current limit, by compensating for that VBE tempco with the tempco of the Schottky rectifier D3.
While this will provide a good current limit with well-behaved loads, it may not turn on the 2N3904 quickly enough with severe loads. So I added the little diode D4. This will give a short-term current limit at perhaps 1 A, which will rapidly fall to 0.3 A.
Now how about the long-term current limit, in case of a short? That FET is going to get HOT!
Well—why don't I add R6 and R7? Normally, the voltage across the FET is less than 0.1 V. When it goes into current limit, and the voltage across the FET increases toward 100 V, the current through R7 requires the current-limit voltage across R5 to decrease. So in case of a short, or a very heavy load, the current limit folds back, and the heat in the FET decreases. That sounds pretty good. But what if you need to start-up a heavy load? That current through R6 would prevent the limiter from starting in case of filament inrush current, or filter capacitors that need to be charged.
Well—let's add one more Band-aid. Let's add C4. This will let the limiter put out a LOT of current for a short time, for start-up. How much power loss? At 0.3 A, the burden (IR drop) is only 0.4 V for the limiter circuit, plus 1.2 V for the rectifiers.
Well—that sounds like a good theory. Does it work? Let's see. When I drafted this, I hadn't yet built this. But I felt it was well engineered, so I wasn't too surprised that it really did work as designed, when I built it.
I evaluated it very gingerly with light loads, moderate loads, full loads, and overloads. I ran it on a curve-tracer, and turned up the voltage very carefully. When I saw that it met every requirement, I dropped a short across the load. The curve tracer grunted, but the regulator survived.
Then, I plugged that circuit into the WALL and applied all kind of loads. After it survived every test, I shorted the load again. I was pleased to see that it ran cheerfully, it survived, and it didn't get very hot.
DISCLAIMER: Kids, DON'T just try this at home. Working with high voltages can be lethal if you get sloppy. When working on this circuit, turn the power OFF and unplug the cord. If possible, use an isolation transformer. Additionally, use a variac so you can turn up the voltage gradually when starting out. Wear safety glasses for all high-voltage testing. Keep one of your hands in your pocket when actually working on the circuit, to prevent a loop that could send lethal currents through your chest. Be careful of high voltages. If possible, work on this ONLY when somebody is around to give you first aid and call a medic, in case of shock or explosion. This high-voltage circuit is NOT guaranteed for anything. It does NOT come with a guarantee of some safety margin. Plus, it hasn't been evaluated with any loads other than resistive. Still—it's a pretty good place to start. /rap
All for now. / Comments invited!
RAP / Robert A. Pease / Engineer
P.S. The last time I designed such an "electronic fuse," it blew up the FET three times in a row when I applied a short. I then gave up. This design seems to work much better. But if I keep decreasing the sense resistor by 3 dB at a time, I wonder how far up the current limit can go before it starts blowing up! But I'm not going to look at that tonight!
Read more article from Bob Pease on Analog Vol. 1.
About the Author
Bob Pease
Bob obtained a BSEE from MIT in 1961 and was a staff scientist at National Semiconductor Corp., Santa Clara, CA, for many years. He was a well known and long time contributing editor to Electronic Design.
We also have a number of PDF eBooks by Bob that members can download from the Electronic Design Members Library.
Voice Your Opinion!
To join the conversation, and become an exclusive member of Electronic Design, create an account today!

Leaders relevant to this article: