Download the PDF of this article.
Modules and boards are great for prototyping, but what happens once the prototype is working and customers and marketing are clamoring for finished product? Answer: It’s time to build or buy a solution that can be delivered.
One of the most popular prototyping platforms is the Raspberry Pi, currently in its third incarnation. I had my hands on it a while back and it was a lot of fun. It also has a host of complementary hardware and software, which is why community is so important with platforms like this.
Unfortunately turning a Raspberry Pi 3 project into a product might be a little more difficult that one might think. At this point you can:
- Buy lots of Raspberry Pi 3 boards
- Design a custom board and buy a few million BCM2835 chips from Broadcom to populate them
- Redesign the application for another platform
- Use a Pi Compute 3 module
The first option might work if you only need a few boards. It tends to get expensive in quantities. The second option only works for very large projects as the chip is not available from your local electronics distributor. Likewise, the Raspberry Pi isn’t just the Broadcom SoC; getting the matching hardware is necessary to minimize software migration issues.
The third option is only for those that wish to do a major redesign of the hardware and software. This does make sense in many instances, but it is a major hardware and software job, since a new prototype will need to be built and the software will need to be migrated to the new platform. This isn’t so difficult if the majority of the software runs on Linux and the new platform is similar.
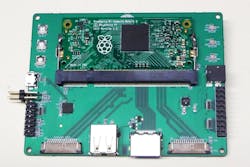
The last option is to use the Adafruit Pi Compute 3 module (Fig. 1), available from Newark/Element 14. Converting a Raspberry Pi project into a product could be as easy as plugging in a Pi Compute 3 module into a carrier board. The Pi Compute 3 module essentially replicates the core of the Raspberry Pi 3.
The Pi Compute 3 module includes the following interfaces:
- 48 GPIO
- 2 I2C
- 2 SPI
- 2 UARTs
- 2 SD/SDIO
- HDMI 1.3a
- USB 2 host/OTG
- A parallel RGB display
- SMI NAND interface
- CSI camera interfaces, a 4-lane and a 2-lane at 1 Gbits/lane
- DSI display interface, a 4-lane and a 2-lanev
Note that the Ethernet port isn’t included, as it is a separate chip that would have to be included on the carrier board needed to host the Pi Compute 3 module. The same is true for the multiple USB ports. A USB hub chip is required for additional ports.
The module also contains 512 Mbytes of LPDDR2 DRAM and a 4 Gbyte eMMC chip. A less-expensive Lite version of the module is available without the eMMC chip. The module also has an input to disable the eMMC chip.
Hands-on the Pi Compute 3
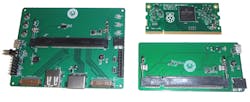
I got my hands on a Pi Compute 3 module, but it doesn’t do much without a carrier board. The carrier boards were almost as hard to get as the module. However, Gumstix came through with its Pi Compute Dev board and the Pi Compute FastFlash board (Fig. 2).
The Pi Compute FastFlash board is needed to program the eMMC flash memory on the module. I downloaded the stock Rasbian Jessie Lite. The Pixel version does not fit into the eMMC. The Lite version was installed via the USB connection to the Pi Compute FastFlash board and my PC. I used Linux on the PC but this can be done using Microsoft Windows or an Apple Mac.
The module was then moved from the Pi Compute FastFlash board to the Pi Compute Dev board. The system was connected to an HDMI display and a USB hub with a keyboard and mouse attached. Power was applied, and I was up and running.
I did twiddle the signals on some of the 16 GPIO pins connected to a 20-pin header. Another header provides access to a serial port that is an optional interface to the operating system. There are two PWM headers, as well. The small connectors on either side are for a CSI2 camera and DSI display. I did not have either of those devices handy.
Other than no Ethernet port, the system was as easy to use as the Raspberry Pi 3. Eventually I switched to a Bluetooth mouse and keyboard. This particular board is more suited for display chores, while the Gumstix Pi Compute USB-Ethernet carrier board is more suitable for network or USB work with a pair of USB Type-A connections and a 10/100 Base-T RJ-45 socket.
There are now quite a few Pi Compute compatible carrier boards. Some target development exposing all the module’s pins.
Generate a Custom Pi Compute 3 Board
The carrier board I used was created by Gumstix using its Design-to-Order (D2O) web-based system called Geppetto. This tool sits been a conventional PCB creation tool and an end product like the Pi Compute Dev board.
Geppetto requires a designer to select from a set of items like USB and power connectors and to place them on the board, but the tool handles the wiring details. The logical connections between items must be done as well. For example, the USB host connection on a module socket like the one for the Pi Compute module can only be linked to a USB socket or USB hub. A design is ready only when the minimum requirements are met, including sufficient power.
The board design for the Pi Compute Dev and other Gumstix boards are available as projects on Geppetto, so you do not have to start from scratch. This allows a designer to remove what is not needed and add what might be missing for an application.
Designers can also start with a blank board. The selection of components is limited to what Geppetto provides, but it includes sockets for a range of modules—not just the Pi Compute and Gumstix’s own modules. It also has USB hubs, wireless and wired networking options, and even memory like an 8 Gbyte eMMC module and a 128 Kbyte FRAM module.
Geppetto shows the per board price for a complete, populated board. There is also a $1,999 one-time set-up fee. That works out to only $2 per board if you need 1000. Boards tend to run from $50 to $200 depending upon the design and components. This can be a bargain for developers, especially for an initial run of a few hundred boards.


