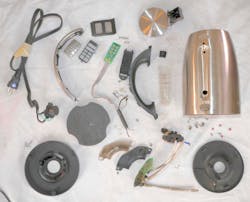
I happened to be walking in my kitchen when my Cuisinart tea kettle (Fig. 1) started to make a hissing noise. Smoke began pouring from the base. I rushed over, unplugged it, noticed it was boiling hot, and filled it with cold water. In retrospect, I wish I had just let it burn, to see if its safety features would prevent a house fire. Go easy on me, when an electrical engineer sees smoke, they just have to do something.
1. The Cuisinart CPK-17 PerfecTemp 1.7-liter stainless-steel cordless electric kettle sells for 75 dollars.
The kettle was empty. I had not used it for a day. I was not using the ice-maker or any other electrical appliance when it smoked. There are severe lightning storms in Florida, but none in the last few weeks. It was time for a teardown (Fig. 2).
2. The Cuisinart kettle tears down into several electromechanical and electronic subsystems. The red fiber washers are indicative of the great quality and good design of the product.
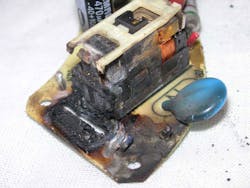
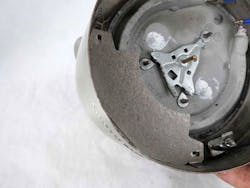
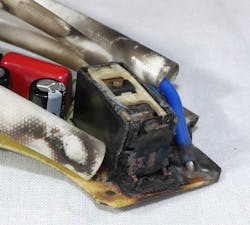
What burned was the main relay that sends power to the heating element (Fig. 3). A non-technical type might say “Cuisinart is junk,” or “Song Chuan relays are junk.” Engineers know better. It might have nothing to do with the relay; for all I know, the software went whacko and turned on the pot while empty. I have a real problem saying Cuisinart has a problem since the design and assembly of this product seemed exemplary. This is what keeps engineers up at night. Perhaps it was a problem relay, so you have to design for that potential problem. Or maybe it is some obscure failure mode I can’t figure out.
3. A relay in the electrical PCB caught fire while the kettle was sitting unused on the countertop.
While I can’t fault Cuisinart design and manufacturing, I do have an issue with their customer service. The kettle was less than a year old. OK, I figure call up Cuisinart, tell them it caught fire, and wait for the new one in the mail. Nope. They wanted me to pay to ship it back—either the whole thing then free shipping back, or send the cord cut off, and I think it was still 8 bucks shipping. So I told them I really resented having to pay for a defective product, and instead of sending it back, I would just write it up in well-respected international engineering magazine.
If the courteous, pleasant, understanding Cuisinart customer service representative said, “OK, we’ll get a new one out to you today, can you send this broken one overnight FedEx next morning to our engineering center?,” I would have gladly spent the 150 bucks in the hope I could help my fellow engineers understand the problem. But I am not paying so much as one dollar to be treated with no respect.
Amazon just sent me the wrong safety glasses, and when I put in for the return, they said to keep the sunglasses they sent by mistake, and then the right glasses arrived two days later. This is establishing the bar for what consumers expect. I did buy the Cuisinart tea kettle on Amazon, but it was past its free return period. The Cuisinart episode changed my whole lifestyle. Now I just pay for ready-made iced tea.
Start at the Base
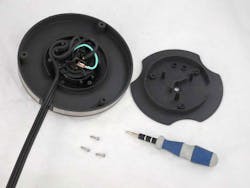
The Cuisinart electric tea kettle has a base that plugs into the wall (Fig. 4). There’s at least one sociopath in the Cuisinart engineering department who decided to use triangular-head screws in the base. Thankfully Kyle over at iFixit gave me a tool kit that has a three-point screwdriver bit. I thought the smoke was coming from the base unit, but the base is passive—it’s just a connector that passes wall voltage into the pot itself. Note that it also passes earth ground in the center pin; the metal construction means this kettle cannot be a double-insulated product.
4. The base unit is passive—it just passes wall power and ground into the kettle. The base screws together with triangular-head screws. Thankfully, a bit is included in an iFixit tool kit.
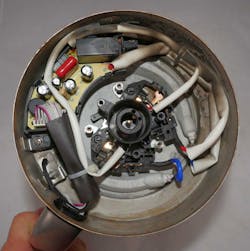
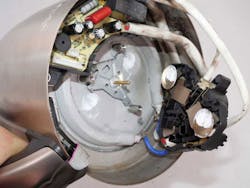
The base of the kettle itself is held on with Philips-head screws (Fig. 5). You can observe the earth ground pin in the center. The burnt relay is at the 12 o’clock position. The PCB (printed circuit board) appears to be cheaper paper-phenolic, not FR-4. A bendable tab restrains the high-voltage wiring at the 1:00 o’clock position. The handle contains the microprocessor. It connects to the PCB with a ribbon cable. There are also short cables for the thermostat sensor at the 7:30 position, and for an LED that lights the level sight-glass on the side of the kettle. The center unit has an unused ground tab at 10:00 o’clock. The heating element leads are welded on; solder would melt. Heater element resistance is 9.5 Ω.
5. The bottom of the kettle is held on with three Philips-head screws. The center unit has over-temperature cutouts on both legs of ac power. The power PCB is retained with a plastic housing. The handle has the microprocessor that connects with a ribbon cable to the power PCB.
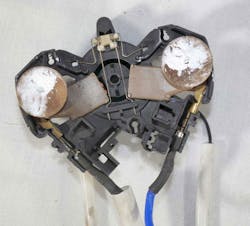
The center unit has two thermostatic Belleville springs that will cut off ac power if the pot overheats (Fig. 6), which is redundant: Cuisinart engineers put cutout switches on both legs, another indication of the thorough and safe engineering that went into this product. I broke off the metal tabs that separate the sheet metal base from the plastic part. I should have unscrewed the three standoffs so that the center unit would come out with the sheet metal attached.
6. Removing the standoffs would have released the base center unit. Instead, I bent off the three metal tabs that connect the sheet metal to the plastic. The sheet metal holds the center earth ground pin.
The center unit is fairly complex (Fig. 7). In addition to connecting ac power and earth ground to the base, it has those thermostatic cutoffs. It also has a spring lever arrangement to promote popping the connector out of the base, which is what those hairpin springs are for. I assume the base unit was light enough that it would not separate when you picked up the pot without this complex feature. This is more evidence of good solid engineering and testing. The design and quality of the unit has that great aspect of high-volume design where you can afford to pay a lot for good engineering and testing. Note the white thermal grease on the Belleville thermal washers. The washers are marked 475 W, not sure if that’s the temperature that they trip, but it would have to be Fahrenheit.
7. White silicone grease ensures good thermal contact with the thermal cutout disks in the center unit.
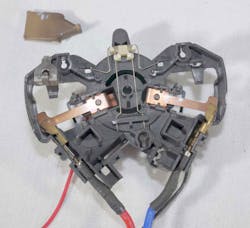
Removing the bimetallic thermal washers reveals the cutout switches in both legs of the ac power line (Fig. 8). Looking at all of the features on the plastic, this was not a cheap mold to make. Wire retention, the shrink-wrap, and the white silicone high-temperature sleeving all show careful and competent design.
8. The contact assembly for the thermal cutout switches are well-designed and -assembled.
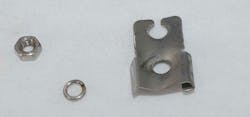
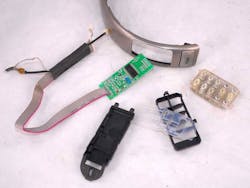
The water temperature sensor is near where the handle connects to the kettle (Fig. 9). There’s a milky silicone gasket and the sensor is in direct contact with the water. A clip with a nut and lock-washer retains the sensor. A cable-tie on the two-lead ribbon connects the blue LED backlighting the level sight-glass. A small tab molded into the handle lets the assemblers retain this cable. I assume early prototypes had trouble with the LED slipping down.
9. A water temperature sensor protrudes into the kettle and has direct contact with the water.
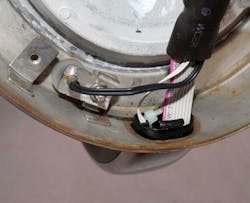
The one design failure I found was the water sensor clip (Fig. 10). The flange that was supposed to straddle a tab in the kettle got folded underneath when the assembler tightened the nut on the stud. There’s no way this clamp can fit the tab and sensor. The use of lock-washers is especially impressive to me. I worked at military contractors that had data on how much vibration resistance lock-washers provide by pre-loading the fastener. One interesting fact is that lock-washers wear out. If you remove and tighten them back five times, they provide no vibration resistance anymore. That’s why I have boxes of new lock-washers I use when I work on my motorcycles.
10. The clip for the water temperature sensor does not fit the kettle and bent-in assembly. Cuisinart engineers provided a lock-washer for reliable retention.
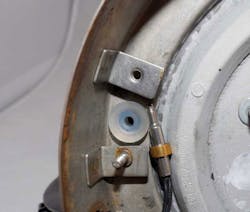
The sensor clip is connected to a stud on an L-bracket (Fig. 11). The sensor seals to the silicone gasket that fits into a hole in the bottom of the kettle. The other L-bracket is where the PCB housing screws in. It’s very impressive that Cuisinart can spot-weld these tabs in and not mar the surface of the kettle. There’s good solid impressive engineering everywhere you look in this product.
11. The sensor is sealed with a silicone gasket grommet that goes into a hole in the base of the kettle.
Manhandling the Handle
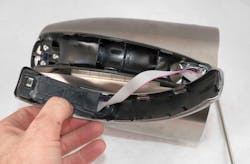
I struggled to open the handle until I realized “You just get rude with it,” as a biker buddy used to say. The chromed plastic outer just snaps out when you pry it up (Fig. 12). Unlike a semiconductor machine I worked on, the cables don’t captivate the handle electronics to the pot. The hole in the black plastic base of the handle passes the ribbon cable connector. Bravo Cuisinart.
12. The chromed plastic handle outer snaps out of its plastic base.
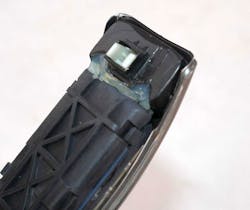
A design problem showed up where Cuisinart assemblers had to use silicone sealant at the top of the handle electronics assembly (Fig. 13). This is obviously something added after testing or release. The problem with this kind of fix is that it’s expensive and uncontrolled. You can see a person had to glom the sealer on between the microcontroller housing and the lid release button housing. This isn’t repeatable, and that’s always bad in manufacturing. Since it’s hand work, it’s also expensive. Still, it must be cheaper than re-tooling the plastic dies to fix whatever water intrusion problem they had without the silicone sealer.
13. A dab of silicone sealer reveals a water intrusion problem that showed up after product introduction.
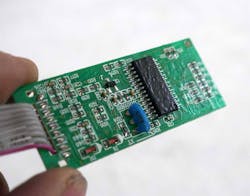
The handle subassembly is another feat of impressive engineering (Fig. 14). It’s a fine example of well-partitioned modular design. The microcontroller PCB has tact switches on the back that the buttons actuate. The electronics work without being assembled to the housing or keyboard or handle. This makes it easy to test in high-volume production.
14. The handle has good modular construction. The keyboard buttons actuate tact switches soldered to the back of the microcontroller PCB. The harness has the ribbon cable to the power PCB, as well as a two-conductor cable for the sight-glass light, and a two-conductor cable for the water temperature sensor.
The “Open” button is purely mechanical and is part of the handle cover assembly. It passes a plunger into the lid hinge to release the spring-loaded lid. There is a silicone gasket to keep moisture off the back of the PCB where the tact switches are. And note that Cuisinart did not try to engineer the switches themselves, like some products. They soldered tact switches onto the board. There’s as much engineering in a switch as any other electromechanical device, and it’s better to stick with purchased parts rather than cheap out with home-brew PCB contact springs.
The Lid Tops Things Off
The three screws that retain the top of the handle screw into the lid hinge assembly (Fig. 15). You can see shiny things at the inside of the two pockets. I thought these were spring catches for the handle, but they are just the bottom of the screws. I realized you just pry the handle apart to get at the screws.
15. The spring-loaded lid releases when you press a button on the handle. The three screws that secure the top of the handle base screw into the lid hinge assembly.
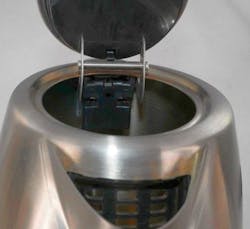
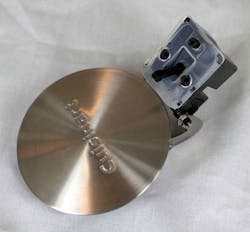
With the three screws removed, the lid comes out (Fig. 16). There’s a gasket to keep moisture out of the handle. This is another bit of impressive design, since the gasket has to comply with the lid-release plunger you see sticking out between the two screw bosses. The spring-loaded lid worked smoothly and flawlessly—more good, solid engineering.
16. The lid assembly has a silicone gasket to prevent water intrusion into the handle.
Water Sight-Glass
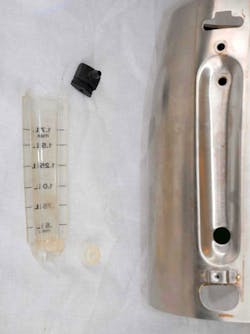
The fluid-level sight-glass was a clever design (Fig. 17). The bottom of the plastic sight-glass has a protruding spigot. It passes through a silicone grommet at the lower part of the recess. The top of the sight-glass is open, so it can be molded. That open top is sealed with the black rubber plug at the top of the sight-glass. The plug has a hole that passes from the sight-glass chamber to a protrusion that goes through the upper hole in the recess. It allows air to vent back into the kettle so that the sight-glass level represents the fluid in the kettle. I would love to use these parts to make a gas gauge for my old motorcycles. Nothing is more reliable than seeing the actual level of fluid in the tank.
17. The sight-glass fits into a recess in the side of the kettle. It has a silicone grommet gasket at the bottom and a black rubber top seal and vent at the top.
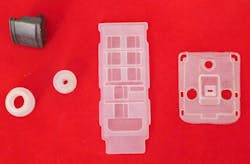
There are five gaskets in the kettle (Fig. 18). At lower left is the bottom gasket for the sight-glass. Above it is the black rubber gasket for the top of the sight-glass. To the right is the gasket for the water temperature sensor. In the middle is the gasket for the microcontroller PCB; it covers the tact switches. On the far right is the gasket for the hinge lid assembly.
18. The kettle has five gaskets that keep the water sealed in the kettle.
The kettle design is very difficult and sophisticated since it crosses so many disciplines. There’s high-voltage electrical, electronics, mechanical, thermal, and fluid engineering. It’s a heck of a good team that did all of this work. You can see great engineering in consumer products since the high volumes will pay for a lot of good engineering and testing.
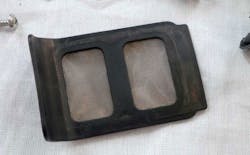
The kettle comes with a little screen that fits just inside the spout (Fig. 19). I thought this was silly, until I saw that the water boiling is tumultuous enough to break open teabags. This screen catches all of the loose tea—you don’t have to filter it out yourself. It slides up and out of the spout so that you can clean it.
19. This screen snaps into the spout to keep tea leaves inside the kettle.
Pyro PCB
The power PCB in the base has a thermal shield underneath it (Fig. 20). It’s another example of the meticulous engineering that went into this product. The power PCB, which snaps into its carrier housing (Fig. 21), has a slot where the relay contacts connect. This is to pass creepage and clearance requirements for UL and other safety listings.
20. A fibrous high-temperature insulating panel shields the power PCB from heat.
21. The power PCB snaps into a black plastic housing.
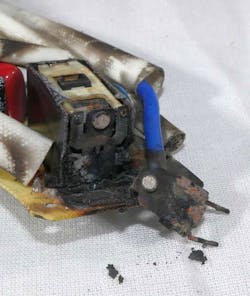
The distance between the pins on the relay are closer than UL allows for acceptable creepage distance on PCB material. So, you cut a slot in the PCB and now you have air separating the pins, and the distance is enough for clearance requirements. What was a creepage distance is now a clearance distance. This is a common practice, there’s nothing shady about it. Still, I wonder why relay companies don’t space their pins commensurate with the voltage rating of the contacts. Some relays do; I bet Cuisinart wished it used those relays. To me, this does look like a creepage failure, but I am not in any way sure. Was the relay on and then it failed, or did the creepage fire cause the contacts to close? It’s hard to say which. Look at the next pictures—the contacts don’t seem to be welded.
The microcontroller PCB in the handle has conformal coating on the top side (Fig. 22). While you might be tempted to conformal coat the power PCB to increase its creepage distance, not all standards recognize conformal coating as an approved insulation system. So while conformal coating will in fact improve the creepage, it will not be a legal way to do it, so please don’t use it. Slots are better and legal.
22. The microcontroller PCB is protected from humidity with conformal coating.
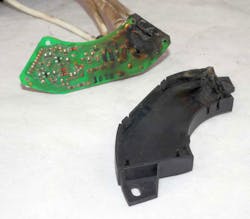
I pried the housing off the failed relay (Fig. 23). Both contact leaves had de-soldered from the board. At first blush, I would think the failure mode was that the contacts fused, and it just kept heating the empty kettle until the whole base got so hot that it de-soldered the relay, which was also self-heating from the current it was carrying. With no solder, it then started to burn.
23. The relay that caught fire has both contact leaves de-soldered from the heat.
Yet runaway heating is an expected failure mode, so the thermal cutouts in the base unit should have tripped before the relay melted. If the software went bonkers, it might have just commanded the relay on, even though the sensor was not in water. That’s another expected problem: People turning on the kettle with no water. So even though the sensor is not in any fluid, the air in the pot might get hot enough to give the sensor a signal, or the cutouts should open. No, there’s something much more tricky and insidious going on here.
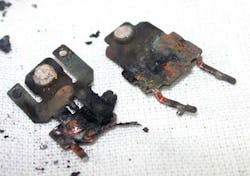
The non-movable contact leaf just fell out of the PCB (Fig. 24). If the contacts were welded together, you would not expect this to happen. Working on old Harleys for decades has taught me it’s not the broken thing that’s the cause, it’s often the effect. I thought I had bad regulators and generators until I realized the wide rear tire was shorting out the rear taillight wires. So, if I hit enough bumps with the brake or taillight on—zap—it took out the generator or regulator. You may have heard the joke about how 20-dollar transistors blow to protect a 15-cent fuse. This may be a similar situation, where something else goes wrong, and it’s the relay that takes the punishment.
24. After cutting open the relay housing, the contact leaves just fall out.
The relay contacts look used, but not fused (Fig. 25). Things got so hot that one of the pins melted off. I will admit, I just don’t know. I have seen welded contacts and they are really stuck together with a little bluing around the edges. These contacts don’t look like that. Maybe this was a simple creepage failure, and the fire melted out the solder, but that’s hard to believe. And never ever doubt that software could be to blame. Ask any programmer and they will tell you how complex and tricky software is.
25. While the contacts look used, they do not appear to be welded together. I have no explanation as to what caused the failure.
Electronics folk often think their discipline is hard and electrical and mechanical design is easy. Nothing is further from the truth. It’s all hard. Every engineering specialty has its own difficulties. When I worked for a truck manufacturer, we used thermal breakers in the cab to protect lighting circuits. They worked fine for dead shorts. But if the short was intermittent or partial, it would just reduce the pressure on the contacts in the breaker, until they overheated, caught fire, and killed the trucker in the sleeper cab. The thing that was supposed to protect against fires caused the fire. Magnetic breakers are much more expensive, but how many people do you want to kill before spending a little money to solve the problem?

