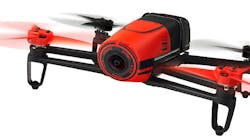
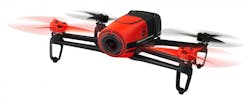
1. The Parrot Bebop drone uses digital image stabilization to deliver HD video over WiFi.
There is a lot of competition for consumer and prosumer drones these days (see “Keep an Eye Out for Quadcopters”) but the Parrot Bebop (Fig. 1) stands out for a number of reasons. This includes the ability to fly without line-of-sight visual (although the FAA does not want you doing that outdoors) because it sends back digitally stabilized HD video in real time via its WiFi link.
The $500 Bebop Drone is very light at only 400 g. It is made of lightweight ABS that is reinforced at key areas. The upper camera platform is mechanically isolated from the flight frame to minimize vibration. The camera and electronics are surrounded by expanded polypropylene (EPP) foam as are the optional bumpers that protect the propellers if you bump into the wall. I highly recommend keeping those on until you are an experienced pilot even though removal provides a more stable platform. I clobbered one propeller and damaged a landing leg in the first week of flying.
That brings me to another nice thing about the Parrot before I get into the details of the hardware. Everything is replaceable. This includes the processor board. The unit comes with an extra set of four propellers that I have already taken advantage of. I did have to order a new set of landing gear. Don’t ask how I crash landed to break that. It is actually quite difficult.
In any case, on with the functional details of the Bebop. The on-board processor is a dual core, Cortex-A9 CPU with a quad-core GPU. The on-chip hardware helps process the images from the 14 Mpixel camera into a stable result that is a subset of what the camera sees. The software also has to adjust for the 6-element, fisheye lens that provides a 180-deg. viewing area. This actually allows the user to pan around without moving the drone. The system can grab still images with a 3800 by 3188-pixel resolution. The results are very impressive especially when viewing captured video that can be stored in the 8 Mbytes of on-board flash memory.
The Bebop has the usual 3D magnetometer, accelerometer, and gyroscope along with an optical-flow sensor, ultrasonic sensor, and pressure sensor. It also has a downward looking camera that provides horizontal velocity by comparing images to travel movement. The ultrasonic sensor also aims down to detect height up to 8 m. The Bebop can go a lot higher, but the accuracy of its altitude information goes down.
Set Up and Flying
The Bebop comes with a pair of batteries and a fast charger. It takes about 40 minutes for a full charge and a single battery provides at least 10 minutes of flight time. Swapping batteries is quick, but be careful of the heat sink that can get rather hot. It highlights how much power the processor is using since the heat from the motors is actually dissipated by the air moving past the propellers. You eventually get used to grabbing the unit top and bottom instead of the sides because of this. A pair of gloves tends to be handy as well.
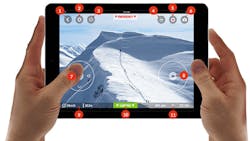
The Bebop is its own access point and it is how you link to the controller, which is a WiFi-enabled smartphone or tablet. I used the Bebop with a Nexus 7 tablet and a Samsung Galaxy S5. They both run Android. The FreeFlight app (Fig. 2) is free and it is available for the Apple platform as well.
The FreeFlight app has a built-in video tutorial, but it’s annoying thst the flight-control aspect is not available because it is only presented once the WiFi link has been established. There is probably a way to change this, but I have not found it yet.
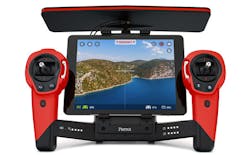
The controls for FreeFlight are easy to use although the physical joysticks of the Parrot Skycontroller (Fig. 3) are better. Most of my flying has been done with the tablet and smartphones alone. The Skycontroller has two joysticks while the FreeFlight app has two virtual joysticks that operate differently than the Skycontroller counterparts. The Skycontroller is a requirement when using something like the Oculus Rift 3D virtual headset to view the information coming from the Bebop via an HDMI link from the Skycontroller. It can hold a tablet but the Skycontroller has its own WiFi link that is supposed to extend operational range to 2 km. It also has a sunscreen for the tablet that turns out to be very useful in sunlight.
The right “joystick” for the FreeFlight app is actually a button that detects when you have a thumb on it. The Bebop’s horizontal movement now tracks the tilt and rotation of the smartphone or tablet. This actually works well for panic stops because you just lift your thumb.
The left “joystick” handles rotation and Z-axis movement. Adept pilots can make the Bebop fly up and around with smooth movements. As they say in the Wrath of Khan, my pattern indicates two-dimensional thinking.
There are a couple of saving graces with the system though. The first is takeoffs and landings are essentially automated. Press the takeoff/landing button at the bottom and the Bebop slowly rises about a meter. Press it again and it alights to the ground below. The GPS support allows a return to home/starting point feature that can be actuated from FreeFlight or, if the Bebop loses WiFi connectivity, that would occur if it flies out of range. Of course, there are hopefully no objects in the way of a direct flight back from the current position, since there are no obstacle sensors on the Bebop.
The Bebop does know when the propellers hit something and all will be stopped when this occurs. That often means the unit will simply fall to the ground when it collides with something or someone. That is not too much of issue under 10 feet since the unit is relatively light. In general, it is a good idea to avoid collisions. Still, putting your hand into the propeller is one way to stop the system should it decide to go incommunicado.
It is best to start flying the Bebop outdoors. This actually slowed things up for me because the weather has been a bit nasty around here. Yes, you can fly the Bebop inside, but make sure you have enough space especially for landing. I don’t recommend doing this to start with as I learned myself. It does nasty things to newspapers, tablecloths, and cats, too. It is especially spectacular even with the bumpers when flying into the wall, in a stairwell, and halfway up the steps.
By the way, there is a “hull” setting to tell FreeFlight that the bumpers are installed. This allows it to adjust for the change airflow, otherwise the Bebop tends to drift. The Bebop manual is available online and it is not included in the box. It is also more detailed than the presentation presented by Freeflight. It is worth reading before you take off. It is possible to get going with the Quick Start Guide, but buyer beware: It is quick and it leaves a lot out.
I have used it indoors in a very large, empty room (think basketball gym). That tends to be an ideal scenario, assuming that is nothing fragile to fly into and a relatively clear floor. On the other hand, it is a great way to quickly clear off tables assuming you don’t mind paper flying all over the place.
FreeFlight and Bebop have some tricks like takeoff and landing that provide semi-autonomous operation. There is also a one-button flip that lets the Bebop somersault and fly upside down. This works as long as there is sufficient clearance to perform the maneuver.
Capturing Video
The unit will be streaming video in real time to the FreeFlight app and the controls can be used to pan the logical view. There are buttons to start on-board recording using the 8 Mbytes of flash as well as the ability to take even higher-res still images.
The quality of the video is on par with the typical HD camcorder. The difference is that the Bebop will be flying around or hovering. The image stabilization will be in play as well and the results are solid when hovering and smooth when flying. Keep in mind that the 4K camera available now will be better, but getting one flying is going to be a lot harder and probably a lot more expensive. The Bebop will be great for an exterior house inspection, but probably not for a feature film.
The fixed camera works well for following the flight of the Bebop and it is pretty good looking down as well, but definitely not comparable to a gimbaled camera system like that found on DJI’s Inspire 1 (see “Keep an Eye Out for Quadcopters”). A gimbaled system allows the camera to face in almost any direction regardless of the orientation of the drone. The problem is that these systems tend to be heavier, more complex, and more costly.
Still, the 180-deg. fisheye lens makes a big difference in being able to see most things in front of the camera. A little experimentation or pre-planning can make the difference irrelevant for many shots, and there is no issue if the camera can easily be aimed at the desired target such as the side of a house or bridge for inspection.
What’s Next?
I plan on looking closer at the programmed flight modes and the SDK. The former let you plan a flight and have the Bebop programmatically going from way point to way point using GPS for positioning. This obviously works best when there are not obstacles around or where the flight is well planned. It also works best outdoors where the GPS will be operational.
The SDK is for those more programming expertise. The SDK actually addresses the range of Parrot drones that includes ones that flight and roll. It can be used to create alternate remote control applications.
If you are looking for a drone then the Bebop is a great place to start. The resulting video can be very useful because of its quality and the drone is relatively easy to fly. Duration on any electric drone will be limited but the fast charge time and a couple batteries means almost continuous flying is pretty close if there is an outlet handy.
Conclusion
Overall, the Bebop Drone is a very impressive system.


