Download this article in .PDF format.
Industry 4.0 is hot, and it’s gaining traction daily because optimizing automated production systems doesn’t just save energy, reduce downtime, and improve yields, it saves a lot of money for those very same reasons. A company with a facility operating at 90% efficiency will outperform a company whose production is only at 80% of its potential, all other things being roughly equal. Better systems save money, energy, and resources at every level, with cascading benefits.
These cascading benefits are like a good version of the horseshoe nail story. In the original story, the loss of a nail cost a kingdom. In the new Industry 4.0 paradigm, the horse is smart and self-monitoring, and provided the rider a predictive maintenance alert about the loose horseshoe. Smart tools empower intelligent processes and precision is the grail of any toolmaker. There is no precision without feedback, and accurate, efficient, and functional sensing is a critical enabler.
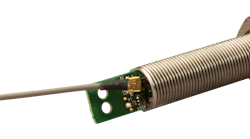
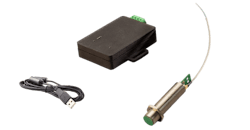
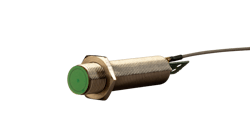
Systems for the precise measurement and control of products and processes, and for the development and implementation of automated manufacturing, assembly, and complex machinery operation, are the new solutions for Industry 4.0 applications. Recently, MTI Instruments created a Bluetooth 2.4GHz wireless capacitive-gap sensor, believed to be the first such device of its type. It’s paired with a receiving device to accurately measure the distance to a grounded metal target, to address precision manufacturing processes. Bluetooth was chosen, as it has already been proven to work in noisy industrial environments and is immune to jamming by other wireless devices.
The transmitter can be permanently mounted on a fixture, or on a threaded probe holder using two jam nuts. The probe/transmitter unit has one connector for the antenna, and a second connector to attach the battery for portable operation The receiver communicates with up to 4 wireless displacement sensors to receive displacement readings, and interfaces as a RS-485 Modbus RTU device which is ideal for PLC interfacing.
We should note here that what we refer to as a “receiver” and “transmitter” is a bit of an oversimplification. Both the “transmitter” sensor and “receiver” are both, in fact, transceivers that can transmit as well as receive. For example, one receiver can interrogate up to 4 separate “transmitter” sensors which allows the user to see rotor tilt, and rotor wear such as a bow in the shape of the rotor. The receiver can also transmit to a sensor and change its sample rate, filtering characteristic, or even check on the transmitter’s remaining battery life.
A “start sample” command is sent to the selected sensor to begin receiving data at a selected rate. For single samples, a manual sample sequence command can be executed at any point. The sample sequence puts the sensor into a powered-on state for a single sample cycle. Upon completion of the cycle, the sensor transmits the data and goes back to a low-power state.
Both the transmitter “sensor” and receiver devices are “Bluetooth” radio frequency transceivers, capable of transmitting and receiving digital packet messages. Multiple sensor and receiver devices may be operated in a close environment as they will not interfere with each other. Users can program and calibrate the probe assemblies with MTI-provided software.
Improving manufacturing
In manufacturing processes, as in everything today, tolerances have tightened up. Even something as rudimentary as textile manufacturing, which has been going on for 50,000 years or more, the control of the machinery that makes this stuff has constantly gotten tighter and tighter and tighter. The tolerances have tightened up, so that you get more throughput out of the machinery. You get your money back faster, the ROI. The gap measurements that you're making in the cutting and sewing machinery are becoming tighter and tighter also. And these are tied directly to quality.
In this case, as an example, if we take a typical carding machine and want it to run in optimal performance, the tolerances, if they can be maintained, will produce the best throughput of the material from the machine, at the highest quality. in this particular case, considering the wireless functionality, sometimes you've got to make high tolerance gap measurements and you just can't get in there.
It used to present an impossible situation, where you can't make the measurement because it's dangerous to address the point of measurement. You can't get fingers in there. You can get a probe tip ripped off, or you can't get a tool in there because it would snag on a rotating surface and tear the tool out of your hand. There's a variety of measurements that are out there like this, where you want to make a high tolerance measurement and you just can't get ordinary tools in there.
Sometimes, the measurement needs to be in a hazardous environment such as exposed moving machinery or poor air-quality environments. It can be perhaps a type of environment that the traditional measurement tools are not suited for. The surface can be magnetized, or it can be an uneven surface. So, all those things may make the options of how else you would be able to measure it very limited. In the case of the carding machine, ripping wires in the machines,
In this application, the traditional way of measuring these things, other than shutting the machines down on regular intervals to take measurements, was with Eddy current probes. Well, because you have spaces between these ripping wires, the Eddy current will not flow into the surface and make a precise measurement. Whereas capacitance being electrodynamic in nature with an electric field—rather than a magnetic field—allows the wireless capacitive-gap sensor to make the measurement.
Predictive maintenance
Another example of an application where clearances are critical is in gas-turbine engines for power generation. In rotating turbine applications there is an output mechanism called a vane, and there's no easy way to make the measurement of the vane position. A wireless capacitive-gap sensor could measure that position.
A key enabler here is predictive maintenance, where it may be very difficult to put a sensor into critical locations in a system, in this case—to determine a valve position. This applies to a multitude of applications, because once machinery has the ability to notice out of tolerance condition poor performance, it can trigger a preventive maintenance action.
Issues like bearing wear on rotating mechanisms, where you have a bearing and there are two surfaces on the bearing, you can't hook a wire to it because it's going to get wrapped around the axle. A wireless noncontact sensor is ideal for such situations.
The ability for a machine to look inside of itself while operating saves both money and effort. Knowing in real-time operational tolerances within a process allows for a feedback loop to adjust that tolerance on the fly. This improves performance, reduces wear, vibration, and thermal loads, while increasing system operational lifetime and reliability. A wireless capacitive-gap sensor gives engineers the ability to create such systems.
Scaling becomes possible
Micron-level measurement in difficult to access environments was just something commonly accepted that you just couldn’t do. In many other industrial applications besides carding machines, where you need to deploy dozens—if not hundreds—of these sensors, not only was it cost-prohibitive, but you just couldn’t reliably get the resolution you needed to make it even worthwhile. Self-contained wireless probes using a capacitance based noncontact method, makes real-time measurement taking feasible with miniature, self-contained capacitance probes to make micron level measurements.
Looking forward
Advanced remote wireless sensing is a force-enabler for next-generation automation functionality, as it enables the system to maintain operational tolerances more precisely and with no downtime. Increased precision in an electromechanical system delivers multiple advantages, each with their own cascade of peripheral benefits.
Smoother, faster, safer, and more reliable industrial systems run cooler, have less downtime, operate more efficiently, and are more reliable, as predictive maintenance significantly reduces the chances of catastrophic failure in any operational process. Wireless capacitive-gap sensor technology and its application can help create these advanced “self-aware” solutions.
Related articles:
Advanced industrial distance measurement
By Alix Paultre
The precise measurement of clearances and operational distances is a critical factor in system efficiency, reliability, and safety. Tolerances are the measure of precision, and there is no accuracy without feedback of some kind.
Time-of-Flight Sensor
Enabling multi-object ranging, STMicroelectronics has extended the capabilities of its FlightSense Time-of-Flight (ToF) ranging sensors family by introducing the VL53L3CX, whose patented histogram algorithms allow measuring distances to multiple objects with increased accuracy. The sensor measures objects at distances from 2.5 centimeters to 3 meters, unaffected by the target color or reflectance.
The ST histogram algorithms increase cover-glass crosstalk immunity and allow real-time smudge compensation, preventing external contamination from adversely affecting the ranging accuracy. This is useful in applications where equipment may be used in a dusty industrial environment. Ranging under ambient lighting is also improved.
In addition, the VL53L3CX has superior linearity that increases short-distance measurement accuracy enhancing wall tracking, faster cliff detection, and obstacle avoidance in equipment such as service robots. Like all FlightSense sensors, the VL53L3CX has an all-in-one package design that eases integration, as well as low power consumption to extend battery runtime. The VL53L3CX is available now, priced from $1.70. Please contact ST for high-volume pricing options.
www.st.com
MLG-2 WebChecker Light Grid Increases Packaging Material Processing Accuracy
SICK’s MLG-2 WebChecker light grid performs high-performance running edge detection, as well as width and center measurement. Used for the processing of web-shaped packaging materials, it is able to detect web width changes or deviations in the web position and report to the follow-up control system of the packaging machine in the same work process with an accuracy of ± 0.3 mm and a resolution of 0.1 mm per web edge.
Available in detection zones between 150 and 3,150 millimeters, the device can also monitor smaller formats without having to readjust sensors or reparameterize the light grid. The user has the choice between different sensitivities for different measuring tasks and surfaces properties, and can even detect semi-transparent products.
Web running control systems are designed to guarantee stable web running through corrections in the machine with the aim of preventing creases in paper webs or ensuring perfectly adapted printing, punching and cutting processes, among other things. Edges are ideal reference variables in such overrun control systems because they can be detected with a high level of precision and reliability using suitable sensors.
www.sick.com
Novel Axial Linear Position Sensor from CambridgeIC Can Locate Free-Rotating Targets
CambridgeIC’s latest axial linear position sensor works with a rotating target and a big gap to the sensor. The Axial sensors can measure the precise continuous position of a freely-rotating wireless target, from the side and with a big gap, without interference from nearby magnets. Gaps of over 10mm are possible between sensor and target, meaning the sensor and the target can be housed in their own packages.
Addressing applications including valve control, hydraulic and pneumatic actuator position feedback, liquid level, and syringe-plunger position sensing, the sensor can tolerate substantial misalignment. In the float level-sensing application this means the float can move side to side with big clearances. In applications such as measuring the linear position of valves and pistons, there is no need to add a special linear bearing to constrain the motion of the target.
To calculate position, the sensor works with CambridgeIC’s CAM312 central tracking unit. This chip measures and processes sensor signals and provides high quality position data to a host device over an SPI interface. CambridgeIC’s resonant inductive position sensing technology is well proven across a wide range of high-volume applications worldwide. For test and evaluation an axial sensor development kit is available.
www.cambridgenetwork.co.uk


