Download this article in PDF format.
As the IoT rapidly gains traction, there’s a clear need for internet-connected sensors that also have a simple display function. Such sensors will highly automate various functions by sending data to the controlling cloud application. Nonetheless, the ability to display information locally is becoming increasingly important in the way that local or field engineers can confirm updated data received from the cloud, or simply confirm that communication and operational functions are normal. This article highlights, using practical examples, a wireless internet-connected display module that achieves the above requirements utilizing a very straightforward, low-cost method.
For the majority of IoT deployments, sensors and actuators will operate wirelessly using either Wi-Fi or Bluetooth. While Wi-Fi is much more power-hungry than Bluetooth, especially the Bluetooth Low Energy profile (BLE), Wi-Fi does have the benefit of being able to communicate over greater distances with a high data-transfer rate. The topology of many IoT deployments includes gateway devices that provide two-way communication with the cloud and a means of batching data collected from Bluetooth-connected local sensors, in addition to some degree of local control function.
For the embedded developer, a number of compact embedded single-board computers feature have Wi-Fi connectivity. Adding a display to the mix can be achieved in a variety of ways, most often using a pre-assembled display module or creating a discrete design.
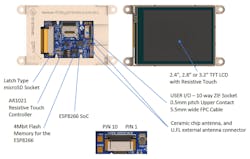
1. This Internet of Displays module incorporates Wi-Fi support. (Source: 4D Systems)
However, recent developments have seen the launch of a complete Wi-Fi-connected embedded platform that incorporates a touch-sensitive display. An example of such a platform is the gen4 Internet of Displays (IoD) series from 4D Systems. Based around an Expressif ESP8266 Wi-Fi microcontroller, the module offers resistive-touch, 320- × 240-pixel, TFT, 65,000 true-to-life color display sizes of 2.4, 2.8, or 3.2 inches (Fig. 1).
In addition to a micro SD socket for use in data-logging and image-file applications, the module has 512 kB of flash memory for user application code and 128 kB of SRAM, of which 80 kB is available for use. Measuring 78.4 x 44.8 x 7.2 mm (2.4-in. model), the modules can be easily programmed using the popular Arduino IDE. A GFX4d library enables the fast development of graphics-based applications through the use of primitive graphics functions—it’s available for download from 4D Systems’ GitHub page.
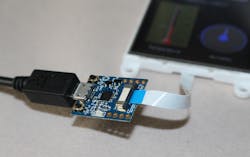
A more integrated and straightforward approach to graphics-based application development is possible with the Workshop4 environment, which can be downloaded for free from 4D Systems’ website. A 10-pin FPC cable connects the 4D IoD to a 4D gen4 IoD programmer (Fig. 2). The programmer provides all connectivity to the module and the means to power, program, and test the IoD module.
2. A programmer board provides debugging and configuration support without having to incorporate it on the module. (Source: 4D Systems)
The ESP8266 is a wireless microcontroller that’s widely supported within the Arduino community. As a result, you will find a plethora of open-source projects that leverage the use of its Wi-Fi capabilities, and connect to free data sources such as Weather Underground.
Applying the Module
The 4D IoD series is suitable for a range of Internet of Things (IoT) applications. Consider, for example, an application that connects over Wi-Fi to a data source—Weather Underground—in order to display the current temperature and humidity for a specific location.
Pulling together this application involves three main tasks: designing the way the weather information is presented graphically; using an API to gather data from Weather Underground; and displaying the information.
Prerequisites to starting this project include downloading and installing the Arduino IDE, and installing the ESP8266 community board manager files, the GFX4d library, and the Workshop4 IDE. Full instructions and necessary files are provided in the gen4 IoD datasheet and on 4D Systems’ GitHub page.
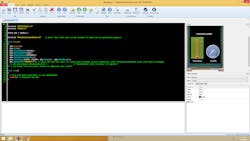
3. The Workshop4 IDE can display code (left) and a simulated display (right). (Source: 4D Systems)
First, let’s tackle the GUI using Workshop4. Having downloaded and installed the latest version, you need to open up a new project and select the gen4 IoD display from the list of available displays. You will see two main window frames (Fig. 3), with the Arduino code (left) and the screen of a virtual 4D module (right).
For this project we’ve opted to drag a thermometer widget to the initially blank virtual 4D screen to display the temperature in degrees C, and a “cool gauge” to display the humidity as a percentage. The screen frame shows the widget properties, which you can amend as required. For clarity, the maximum range of the thermometer was set to 40°C, and the lowest reading was zero. Title captions can also be entered at this stage.
Once you arrange the image widgets, you can then select Compile to generate the Arduino skeletal code, displayed in the left-hand panel of Fig. 3. This process also asks you to copy the two screen layout files it generates for the micro SD card. In this example, they’re called WEATHE~1.DAT and WEATHE~1.GCI.
You can opt to integrate the rest of the required code for the Wi-Fi communication within Workshop4, or simply copy the generated code to your Arduino IDE. Note that if you opt for Workshop4, the Arduino IDE needs to be working on the computer, since Workshop4 makes background calls to it to compile and upload the code. Another file ending in const.h is also generated and needs to be added to your Arduino IDE sketch file.
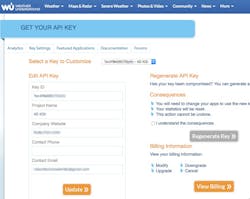
4. Secure communication requires a key generated using the Weather Underground website. (Source: 4D Systems)
The next task is to obtain an API from Weather Underground. This is an easy process that requires the minimum of information. Keep a safe copy of the API generated, because you will need this in the Arduino sketch (Fig. 4). A number of options are available for the API, depending on how frequently you wish to gather updated information. There’s a free option that’s ideal for our purposes with this example application, but note that when developing the code, you should not call the API more than allowed with this option.
The next step is to start pulling together the program to run on the ESP8266. This task is made easier thanks to an open-source example found on this GitHub page. It provides the ideal template to add the necessary sections from the Workshop4-generated code. In addition to incorporating the gen4 IoD graphic functions, most of the main sketch functions also echo out to the Arduino IDE’s serial monitor.
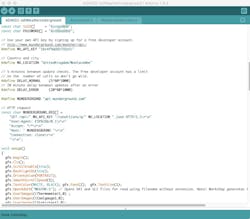
Figure 5 illustrates the initial section of the code. Enter the SSID and password of your Wi-Fi access point, your Weather Underground API, and the location at you wish to receive the current weather information. There’s a specific syntax to the country and location/city, so you’re advised to check the format used at the Weather Underground site.
5. The Weather Underground key needs to be added to the program initialization code. (Source and Credit: bbx10)
Toward the bottom of Figure 5, you will see how your sketch is linked to the Workshop4-generated files with the gfx.Open4dGFX function call. Likewise, the gfx.UserImages(iThermometer1,0) and gfx.UserImages(iCoolgauge1,0) display the initial images with a zero value. The captions underneath each gauge are also displayed in this way.
Within the code, the observed temperature is stored in the floating-point variable otemp and the humidity in the ohumidity integer. Values are displayed as:
UserImages(iThermometer1,otemp);
UserImages(iCoolgauge1,ohumidity)
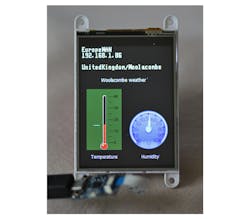
Figure 6 shows the application running on the gen4 IoD module.
6. The application is shown running on the gen4 Internet of Displays module displaying Weather Underground weather observations. (Source: 4D Systems)
Conclusion
This article provides a very brief introduction to how an integrated and compact Wi-Fi-enabled display module can be used to display and process data from the cloud. We haven’t looked at the touch-sensing capabilities of the module, or how to send data to a cloud application in this short article. Hopefully, though, we demonstrated how easy it is to incorporate this compact and integrated intelligent display module into any IoT deployment.
