The eNinja Chronicles (Part 2): Cap'n We've Secured the Dilithium Modules
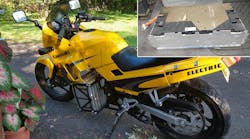
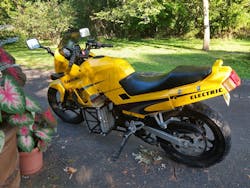
Earlier this year, I bought an adorable home-made electric motorcycle that crammed a 30-kW dc electric motor and a bunch of cells from a Nissan Leaf into the frame of a de-fossilized Kawasaki Ninja 250 (Fig. 1). It would take some work to get it fully road worthy because its batteries had been damaged by a charging mishap, but it seemed well worth the effort.
I decided to blog about the process of building a new power pack, getting the little beast back on the road, and making a few other improvements. A lot has happened since the debut of "The eNinja Chronicles" was posted, so I figure it's time for an update.
I originally intended the battery replacement to be straightforward in order to focus on the improvements I had in mind for the bike. I expected to simply replace the 11 damaged Leaf cells with ones I saw advertised widely across the Internet. While those I could locate were pretty affordable, ($50-$75/cell), they were all removed from cars at the end of their normal service life when their capacity was around 40 Ah, roughly 60% of what they had initially.
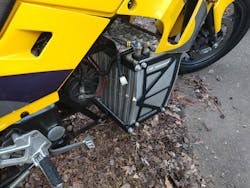
The bike's original battery set came from a low-mileage wreck and had pretty much their original capacity (Fig. 2). Depending on how hard you drove the bike, that gave you 35 to 45 miles worth of range, about the minimum I'd need to use the eNinja as an everyday driver for errands and appointments in the wilds of suburban New Jersey. After some soul-searching, it became clear that the 25- to 30-mile range available from the used Leaf cells was unacceptable. Upon learning it would cost over $2k to buy a set of new Leaf cells, I began a lengthy search for a different solution.
Finding an alternative to the original battery pack was a bit tricky because of the requirements it would have to meet:
- At least 4 kWh worth of capacity.
- A nominal voltage of around 80 V so that it would work with the existing drive system.
- A form factor that didn't require extensive modification of the cycle's frame to accommodate.
- A price tag that was less than the $1000 I originally paid for the bike.
After several months of hunting, an old friend who is much deeper into EVs than I am introduced me to Battery Hookup, a company that buys and sells all manner of surplus lithium-ion batteries and related supplies at very reasonable prices. Since they buy odd lots, their inventory rotates frequently and the hot bargain that was there last week may be gone this week. On the other hand, it also means that new and interesting surprises are popping up on a regular basis. It took another couple of months before one of those surprises turned out to be exactly what I was looking for.
The surprise came in the form of a 28-V, 2-Px8S, 2-kWH module produced by BMW for its 530e sedan, the hybrid variant of the 530 series. According to Battery Hookup, the modules were factory-fresh (probably model year 2018). However, they had been put on the surplus market because of a dimensional error in one or more of the fittings and holes that had been machined into the module case. The modules even made battery management fairly straightforward (or so I thought), thanks to a cable that brought the voltage of each cell and the output of a few thermistors embedded within the pack out to a single connector—more about that shortly.
At 28 V, a stack of three modules in series provides a nominal voltage nearly identical to the original battery. The stack also fits within the battery bracket's current dimensions, making the modifications needed to mount it in the bike's frame (relatively) straightforward. And if you haven't done the math yet, the stack's capacity will be 6 kWh, roughly 50% more than the Leaf cells could provide.
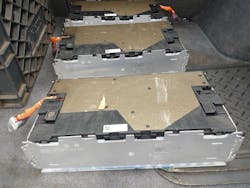
Since Battery Hookup's warehouse is only 20 miles from me, I was able to skip the shipping charges and pick up the modules myself for $200 apiece. Looking at them up close, it was apparent that they were well-engineered and exquisitely manufactured. The rugged aluminum housing was formed from hefty extrusions that had been cleanly welded together and machined to form the necessary features for mounting it in place. The cells are cushioned in a thermally conductive matrix. The side where the cell's electrodes are exposed and soldered to the BMS harness is protected by a sheet of thick fire-resistant mica paper that can be removed for access.
With the three modules secured in the trunk of my Prius (Fig. 3), I felt like my childhood TV hero Scotty, transporting a set of fresh dilithium crystals back to the Enterprise where they would power the starship's warp drives for the next season.
Now all that remained was to make or buy a battery-management system (BMS) for the stack, build a proper wiring harness, and modify the bike's existing brackets to hold their new payload. I began to tackle these projects in late summer, beginning with locating a suitable BMS.
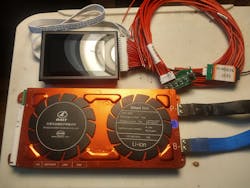
At the suggestion of Battery Hookup, I contacted Daly, a Chinese manufacturer who recommended a variant of their 24S 200A Li-Ion BMS. Among other bells and whistles, I ordered a Bluetooth interface. I'll be able to use it with a phone app as both a dashboard and as a tool to configure the unit. I also ordered a small LCD display that plugs into the BMS and provides battery status information on a per-cell basis (Fig. 4). If all goes well, it will mount on the handlebars to supplement the information provided by the bike's current battery monitor. Daly primarily sells to other Chinese customers, so dealing with their marginal documentation and well-intentioned but English-challenged customer service staff was difficult but eventually productive.
At the same time, I set out to learn enough about the module and its BMS connector to fabricate a mating cable that would connect the battery manager. This has proved to be more challenging than I expected, mostly due to BMW's policy of denying access to most technical details of its products to anyone other than authorized dealers or repair shops. Even the parts lists for each model are guarded like state secrets and the dealers I talked to had little interest in providing the schematics or part numbers for mates to the connectors on the modules.
Fortunately, several online vendors are proving to be a bit more helpful. I think I've been able to identify a part number for the wiring harness that connects to the module's BMS port.
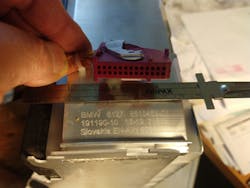
I'm also considering building up my own harness instead of paying $200+ for the factory part. It would be an even more attractive option if I could ever find a connector that would mate cleanly to the module's BMS port. I'm including a photo here in case some kind reader who has experience with such things can solve this mystery (Fig. 5).
Unfortunately, both of those strategies require obtaining information about the function of each of the BMS port connector pins, a task that has proved to be surprisingly difficult. I finally located this schematic and I'm working on decoding it, but it’s so cryptic to me that it may be easier to start probing the module with a multimeter and build up my own diagram. Come to think of it, if I can locate the right connector, buzzing out the module and fabbing the BMS harness may be the perfect project to get me through the upcoming multi-month pandemic lockdown with a few shreds of my sanity intact.
Barring a lockdown-induced breakdown, or contracting the dread virus myself, I'll keep you posted on how it goes. Stay tuned…
Comments? Questions? Care to share the details of your project with your fellow readers? Write me: lgoldberg(at)green-electronics(dot)com.
