This file type includes high-resolution graphics and schematics when applicable.
This circuit was designed to meet a medical application’s requirement to drive a laser diode with reasonable precision and a minimum of components and footprint (the device is now in clinical trials). These diodes are prone to short- and long-term drifts due to temperature changes and aging. Since they’re usually driven from a constant-current (CC) source, their optical output power is monitored and the current adjusted due to varying output power.
The assembly's case was grounded, so the CC source is configured for the high-side drive of the laser diode rather than the simpler low side. Furthermore, the current had to be inherently limited to avoid "tattooing" the patient (not good).
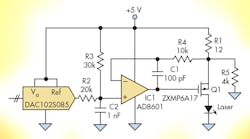
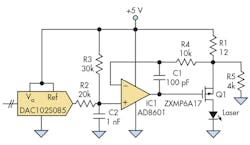
In the single-supply +5-V circuit, current-sense/limiting resistor R1 and P-channel FET Q1 are in a source-follower configuration (see figure). As the FET's gate is brought to a less-positive voltage, the drain conducts, which causes a voltage drop across R1 as current flows through the laser. In the worst-case situation when Q1 saturates, the maximum laser current is defined by:
Ilaser = (5V – Vlaser) / (R1 + Rds-sat)
where Rds-sat = 25 mΩ and Vlaser = 2.0 V
Values for both Rds-sat and Vlaser were taken from the datasheets of Q1 and the laser diode, respectively. The value of R1 is determined by the maximum laser current required (in this case, 250 mA), adjusted by the laser diode's typical forward voltage of 2.0 V as given on the datasheet. Solving for R1 gives:
R1 = (5V - Vlaser) / Ilaser – Rds-sat = 12 Ω
where Ilaser = 250 mA.
Rds-sat is so low that it can be ignored. With both R1 and the maximum current known, the power in R1 can next be determined by:
P = I2 × R = 0.252 × 12 = 750 mW
so that a resistor rated for 800 mW will provide a small amount of extra margin for safety.
The ratiometric DAC provides the current setpoint. It takes its reference from the +5-V supply, and the DAC output tracks supply fluctuations. In operation, the DAC output is set to the required setpoint. R2 and R3 scale this relative to the supply's nominal +5-V rail.
For example, if the DAC is set to the midscale of value +2.5 V, the voltage between R2 and R3 will be +3.5 V, which is the non-inverting input of op amp IC1. In a negative-feedback loop, IC1 adjusts the gate of Q1 so that current flows through R1, Q1, and the laser diode. When the current through R1 drops the feedback voltage to +3.5 V, the circuit is stable. With a voltage drop of 5 V – 3.5 V = 1.5 V across R1, the current must be 125 mA, or midscale. Similarly, if the DAC is set to minimum, or 0 V, then IC1's noninverting input voltage is +2 V. IC1 will drive Q1 until the voltage drop across R1 is 3 V, corresponding to 250 mA. This is the saturation point, where Q1 is fully on and +5 V, minus the drop across R1, is the laser diode's forward-voltage drop.
The complete circuit also includes R4 and C1 for loop stability, with rolloff frequency f:
f = 1/(2 π R4 C1) = 159 kHz
One subtlety of providing a setpoint to the non-inverting input of an op amp (as opposed to summing setpoint and feedback) is that the output tends to step with setpoint steps, as the op amp becomes a follower. C2 adds a pole to low-pass filter the setpoint; in this example:
f = 1/((2 π (R2||R3) C2)) = 13.26 kHz
where R2||R3 is 12 kΩ.
By having this setpoint frequency limit always be much lower than the feedback frequency, the op amp can track the slope of the setpoint steps with minimal overshoot on these steps.
R5 provides an offset by ensuring that a small current always flows through R1. When the DAC is set to full scale of +5 V, the op amp will always have slightly more current than requested. Therefore, it will saturate trying to turn off Q1. Without R5, the input offset voltage Vos of the op amp may see a slight false setpoint and turn on Q1 to balance it.
There's a reason to use a ratiometric DAC. If the DAC reference was a fixed voltage, setting of low currents would be nearly impossible. If the DAC was set just below an exact +5 V, then as the real +5-V supply fluctuated up and down slightly, the setpoint would change drastically. Instead, a ratiometric DAC will track the +5-V supply and can provide a stable relative setpoint.
The price of being able to accurately set low currents is an inferior power-supply rejection ratio (PSRR). In this medical application, this CC loop is only part of a larger CP (constant power) loop, which itself does have a good PSRR. Although the parts count would be increased, adding a small point-of-load (POL) regulator would provide a stable, low-noise supply, if required.
Alan Stummer designs and makes custom equipment for the physics research labs at the University of Toronto, Canada. He was previously a telecom RF engineer during the boom years, and before that did equipment design for steel mills, offshore oil, and mining. He can be reached at astummer@physics.utoronto.ca.


