A Guide to Battery Fast Charging (Part 2)
Members can download this article in PDF format.
What you'll learn:
- Steps to take for evaluating charging systems.
- Testing the starter and fuel gauge.
- Using a Raspberry Pi for system testing.
- Steps for powering up and initialization of the charging system.
For Part 1, click here.
Evaluating a simple charging system and testing its functionality can typically be done with an evaluation kit. These kits include all of the necessary hardware and software applications, as well as graphical user interface (GUI)-based tools and APIs, to configure charging systems.
However, complex systems that require multiple cells are correspondingly more difficult to evaluate. Complex systems may have several devices that must be characterized. Developers will need to write some software code to read the signals generated from different system parts, analyze them, and take action.
Consider two Li+ cells in a parallel battery fast-charging system using the MAX17330. As described in the datasheet, the MAX17330 can be used to charge and control two Li+ cells simultaneously. This system requires two MAX17330 ICs, each managing one Li+ cell, and a buck converter (such as the MAX20743) with the capability to change its output voltage on-the-fly.
A microcontroller is required to configure and manage battery charging as well as handle communication between the two ICs. Because it’s a commonly used platform for system testing, we chose a Raspberry Pi board using Python as the programming language. The Raspberry Pi manages communications over I2C and logs important system parameters useful for evaluation and debugging, including charge current, battery voltage, and battery state of charge (SOC). These values are stored in an Excel file to enable offline analysis.
Testing the 1S2P Architecture
This section shows how the charger and fuel gauge (MAX17330) are tested. It also describes the real performance that can be expected from parallel charging. For the most flexibility and control, the device is programmed by a microcontroller using I2C.
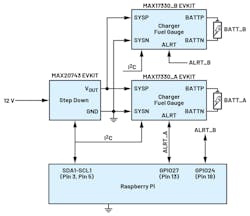
Figure 1 shows the 1S2P system architecture and the connections needed to evaluate the charging of two cells in parallel. The Raspberry Pi controls the three evaluation kits: one MAX20743EVKIT (buck converter) and two MAX17330EVKITs (charger + fuel gauge). Data is logged in an Excel file.
The GUI-based, MAX17330 evaluation kit software is available and can be downloaded from the MAX17330 product page under the Tools and Simulations tab. It can generate initialization files (.INI) for the MAX17330 using the Configuration Wizard (select from the Device tab). The INI file contains the register initialization information for the device in a register address/register value format. This is the file used by the microcontroller to configure the MAX17330 register by register.
The MAX17330EVKIT datasheet details the different steps required to generate the initialization file. The configuration is used to begin parallel charging (Fig. 2). Next, step charging is enabled (Fig. 3). Figure 4 shows the expected step charging profile based on the step charging configuration found in Figure 3.
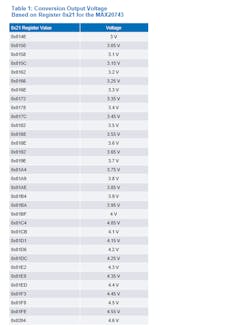
The MAX20734 buck converter is used to increase the voltage applied to the two MAX17330EVKITs when needed. The MAX20734 buck converter changes the output voltage according to the value of the internal register at address 0x21. The buck converter can be controlled via 12C; a class in Python has been written to do so.
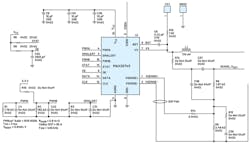
Finally, as shown in Figure 5, the MAX20743EVKIT output-voltage divider is modified for an output range from 3 to 4.6 V (using the values R6 = 4K7 and R9 = 1K3).
From Table 1, we can extract the curve:
where x is the voltage that we want to apply at the output. While this approach will have a slight error, it’s a good way to estimate the desired value of the register from the voltage.
Powering Up and Initialization
When the MAX17330 is first connected to a battery, default register value settings force the IC into a shutdown state. To wake the device, press the PKWK button. This will short the temporary protection MOSFETs and wake up both MAX17330EVKITs in this way.
Next, the Raspberry Pi needs to communicate via I2C with all three devices. Carefully initialize the I2C hardware to avoid device address conflicts. By default, the two MAX17330EVKITs use the same I2C address. The first step is to change the address of one of the two fuel gauges.
The MAX17330 has both volatile and nonvolatile registers (Table 2), with nonvolatile registers identified by the “n” prefix. This also results in a pair of node addresses, 6Ch (volatile registers) and 16h (NV registers).
There are two ways to change device node addresses on the MAX17330:
- Set the nPackCfg NV register using the I2CSid field. This change can be set using the Configuration Wizard (Table 3).
- The I2CCmd register enables dynamic changes to the I2C bus (Table 4).
For ease of use, we use the second way to change the address so that the same INI file can be employed to initialize both devices. Generating settings that can be shared by the two devices simplifies device configuration and eliminates the potential for user error when the address must be entered manually.
Since the two MAX17330 devices share the same I2C bus, this procedure requires that the ALRT signal of one device must be set low while the other one is set high.
Table 5, from the MAX17330 datasheet, shows how the I2CCmd register can dynamically change the address of the device based on the ALERT GPIO pin value.
In this case, the GoToSID and INcSID fields are used to change the I2C address:
Once each device has its own unique address, the entire system can be controlled by a single microcontroller.
Here’s the script for the microcontroller to complete I2C configuration; this will be part of the system initialization:
See Table 6.
Some registers in the nonvolatile space require the firmware to be restarted for the change to take effect. Thus, the following step is required:
See Table 7.
Next, we need to enable interrupts from the chargers:
See Table 8.
Now the devices are initialized.
Logging Data and Interrupts
We need to be able to read registers to log data and check if an interrupt has been generated on the ALERT GPIO lines. We can use this script:
See Tables 9, 10, and 11.
When ALRT is asserted from the MAX17330, the host will perform the following:
See Tables 12 and 13.
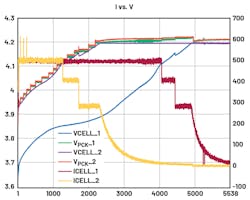
Figure 6 shows the parallel charging plot extracted from the logged data (Excel file). Note how it follows the step charging profile.
FProtStat Register
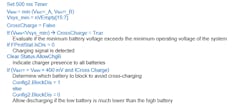
Optionally, once the device moves from the constant-current (CC) phase to the constant-voltage (CV) phase, the voltage generated from the step-down converter can be reduced as follows:
These are all of the steps needed to manage a 1S2P charging configuration. Included in MAX17330-usercode.zip is the Python code for configuring the buck converter (MAX20743) as well as the charger and fuel gauge (MAX17330). It also includes the Excel data log to capture important charging parameters and evaluate the step charging profile.
By managing alert signals generated from the MAX17330, a microcontroller keeps the linear charger of the MAX17330 close to dropout, minimizing power dissipation and therefore allowing for high charging current. A battery pack using the MAX17330 stores the parameters for the installed battery that the host microcontroller needs to implement efficient fast charging. This allows OEMs to replace a standard charger IC device with a simpler and less expensive buck converter without compromising performance or reliability.
Safe, Reliable Charging
Device charging time is one of the most important user experience considerations. Using a buck converter like the MAX17330 makes it possible to efficiently manage a very high current to decrease charging time in a small IC package. The ability to support parallel charging with a very high current, such as with two MAX17330s, enables developers to charge multiple batteries in a safe, reliable manner that keeps charging time to a minimum.
About the Author
Franco Contadini
Staff Engineer, Field Applications, Analog Devices Inc.
Franco Contadini has over 35 years of experience in the electronics industry. After 10 years as a board and ASIC designer, he became a field applications engineer supporting industrial, telecom, and medical customers, focusing on power and battery management, signal chains, cryptographic systems, and microcontrollers. Franco has authored several application notes and articles on signal chains and power. He studied electronics at ITIS of Genoa, Italy.
