This article is part of TechXchange: Power Supply Design
Download this article in PDF format.
Analog semiconductor companies release buck-regulator chips so often you might think nothing of it. Yet there’s an enormous amount of work that goes into getting that silicon ready for sale. As a former application engineer, I can appreciate all the things that have to happen after the silicon is sorted out and working. I was reminded of this recently on a trip to Texas Instruments’ Silicon Valley campus.
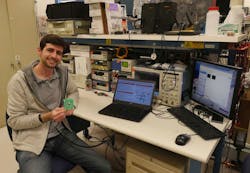
1. Texas Instruments application engineer Sam Jaffe shows off his mHEV (mild hybrid electric vehicle) demo board. It has two power supplies, a buck regulator from 48 V to 12 V, and an isolated flyback from 12-V vehicle to 12-V isolated.
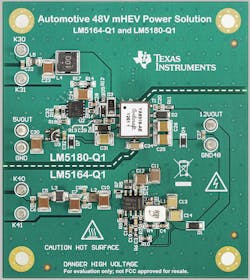
There, I met with application engineer Sam Jaffe (Fig. 1) and learned about the new LM5164 buck-regulator demo board. Jaffe had just finished his neat little regulator board to demo the chip (Fig. 2). Note the dashed line that extends across the PCB (printed circuit board). Delighted, I asked if it represented an isolation boundary, and Jaffe confirmed that it did.
2. The TI mHEV demo board uses an LM5164 and an LM 5180 to make a diode-OR’ed 12-V supply for on-board automotive electronics.
The LM5164 bucks from the 48-V power rail, and an LM5180 flyback chip makes an isolated 12-V rail from the 12-V battery. The two supplies are then connected via a diode-OR bridge. Power guru Alan Martin, who retired from Jaffe’s exact same lab bench, once told me, “You will hardly ever regret putting isolation in your power-supply design.”
An Automotive Buck Regulator
The LM5164 is a 100-V, synchronous 1-A regulator with internal power transistors. It comes in a SOIC-8 package and uses constant-on-time (COT) control. It works down to 6 V and has an undervoltage lockout (UVLO) so that it does not get flaky if the power rail collapses on you. Because the LM5164 can switch so fast, its minimum controllable on-time is 50 ns. This allows you to make large step-downs from higher voltages, such as 48-V telecom or automotive power rails.
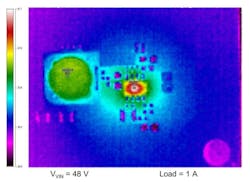
Having worked on the WEBENCH team years ago, I am glad to see the LM5164 is supported in this online design tool. It not only helps you select values, it will give you thermal output maps of the design (Fig. 3). I remember the first time I saw a buck-regulator thermal map in WEBENCH 15 years ago; I was dismayed by seeing a red patch of high temperature. It turns out it was not the TI chip running hot, but rather the catch diode. The LM5164 is a synchronous buck regulator that controls a FET to serve as the free-wheeling diode, so it does not have an external diode that gets hot.
3. TI’s WEBENCH online design program can show a thermal map of your power-supply design.
A Handy Flyback Controller
The LM5180 flyback controller chip works from 4.5 to 65 V. The integrated 100-V power MOSFET can provide for output power up to 7 W. The chip samples the output voltage from the primary-side voltage, so you don’t need an optocoupler from the secondary or a sense winding on the transformer. The primary-side sensing provides 1% accuracy across line and load variations. Like the LM5164, it has UVLO and features the same −40 to 150°C operating temperature. Its fast switching speeds means you can operate the circuit up to 350 kHz
A Gaussian Chamber for Testing
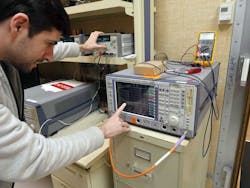
Jaffe had to design and build a PCB that worked, and that’s always difficult. That this board has two separate power-supply circuits makes the task harder. Then he had to test the design for EMI (electromagnetic interference) to ensure that the design would pass strict regulatory standards like CISPR. When Jaffe took me into the EMI screen room at TI, I began to appreciate how much work goes into releasing a fully qualified demo board (Fig. 4).
4. Sam Jaffe in the EMI screen room at TI, where he can measure the radiation and noise of his designs.
Jaffe not only showed me the screen room, he brought in his demo board, powered it up, and took EMI measurements while I watched. He was rightfully proud of the wide EMI noise margins he achieved with his design (Fig. 5). It’s comforting to know that even in a big company like Texas Instruments, there are fellow engineers like Jaffe who are doing a ton of work that makes our jobs easier.
5. Jaffe shows the wide margins his design has to the emission levels permitted by the CISPR EMI standards. The Rohde & Schwartz FSEM30 spectrum analyzer means we can trust the readings are accurate.
Getting the EMI noise characterized and understood is of great value. When we do a bad design, it only shows up at the end of the project, at regulatory qualification. Then it’s a major disaster, involving ferrite beads or shield or hacks, all expensive in time and money. With TI doing the EMI work as part of the demo-board design, it can take a lot of stress out of your design effort.
It’s always possible to ruin a good demo design in your own system, but the fact that the demo board has such wide margins means if you do copy the design faithfully, your design will also pass FCC, CE, and other regulatory hurdles. And don’t think of them as hurdles, but as important feedback on how well you did the design. It’s vital we don’t pollute the world with excessive EMI noise, and designs like Jaffe’s demo board will make it that much easier to reduce emissions.
Let the Chip Maker Help You
Texas Instruments and other companies are glad to show you the layout tricks they use, and many will gladly give you the schematics and Gerber files to make your spin of the design that much easier. Indeed, I asked Jaffe for the Altium schematic of his demo board, and it opened perfectly in my 500-dollar CircuitStudio program that I got from Newark. Jaffe sent me the PCB files as well, but, unfortunately, Altium did not make PCB files inter-operate in Altium Designer and Altium CircuitStudio.
However, even if you can only afford the much cheaper CircuitStudio, you now have a proven error-free schematic to work with. CircuitStudio will also import Gerber files to its PCB layouts, but I find that of limited use. Gerber plots are more like something to trace over with real PCB traces, so that there’s no arbitrary copper floating around in the design. You want your design to be driven from the schematic. The PCB should be intimately connected to that schematic, not something with imported copper.
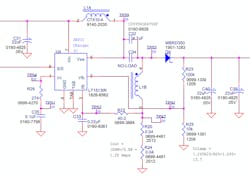
Don’t be like me 30 years ago, when I designed a Linear Tech SEPIC (single-ended primary-inductor converter) controller into an automotive diagnostic tool (Fig. 6). I told the Linear Tech FAE (field applications engineer) Jon Dutra (now at Apple) that I thought the layout in the datasheet was dumb. Dutra was polite enough to not laugh in my face. We are friends to this day because he was patient enough to sit with me and go over every node in the layout, explaining why the nodes with fast-moving currents, so called high di/dt, were tightly spaced. Remember, loops make antennas and antennas radiate. Dutra explained why some currents were triangle waves, and they did not contain high-order harmonics that cause you to fail EMI testing. He noted the critical “switch node” where there were near-instantaneous current changes, and why it was important to lay out that node carefully.
6 The SEPIC power supply, based on a Linear Tech LT1513 chip, can have an input voltage above or below the regulated output voltage. It was ideal for an automotive test system powered from the car battery, an internal battery, or a wall wart.
A Novice Mistake
I shared the same problem a lot of newbie analog guys do. I was used to resistive circuits with which you could infer the currents at a node as being proportional to the voltage. This is not at all true of reactive circuits like a switching power supply. I had a boss at Teledyne tell me the only way to understand a power supply was to put a little coil or current probe or a sense resistor on every branch of the circuit. That way you could examine the currents in the circuit as easily as we examine the voltages. This is why power guru Alan Martin collects antique current probes, to remind him of how important it is to measure the currents in his power-supply designs.
Linear Tech is now part of Analog Devices, but they are the same rock-star analog engineers that are glad to help you succeed. It’s obvious TI and the other respected analog companies are the same way. Realize that if you are tempted to use some no-name knockoff part. The price of the silicon is only part of the cost of that chip you are buying. A large part of the cost is the testing and development and apps work people like Jaffe and his co-workers do.
A hobbyist might get away with a one-off design that’s used for a single project. But an engineer is making a design for production. In that case, you have to ensure that the power supply not only regulates, but also passes EMI and regulatory testing. You are not saving money with that cheap no-name part, you are only putting a time-bomb in the project that will blow up right before production—when you can least afford it.
Read more articles in TechXchange: Power Supply Design
