Robust Industrial Manufacturing Relies on Piezoelectric Sensing
Download this article in PDF format.
The vision of Industry 4.0 is already becoming a successful reality in numerous industrial applications nowadays, in sectors such as automobile manufacturing, medical technology, and electrical engineering. Unprecedented optimization of all production processes is now possible thanks to increased digitization and the growth of machine and system networking. Consistent control of the production chain—with zero-defect production as the goal—is essential for any modern production business to hold its own in the market of the future.
Just a few years ago, virtually all products were still being inspected offline, i.e. after the manufacturing process. Today, by contrast, more and more products are actually monitored during the production process—or “inline”—as a way of avoiding unnecessary costs. For joining, assembly, and testing, sensor technology based on the piezoelectric principle is a fundamental factor in optimizing production processes, with zero-defect production as the goal. This technology is well-suited for measuring physical variables such as force, pressure, acceleration, and torque.
Fundamentals of Piezoelectric Sensors
The physical basis for the using these sensors is the “piezoelectric effect,” discovered by Pierre and Jacques Curie in 1880. When placed under a mechanical load (Greek "pie-zein": to press or squeeze), piezoelectric materials generate electrical charges. A major step toward the application of the piezoelectric effect was taken in 1950, when Walter P. Kistler patented the charge amplifier for piezoelectric signals.
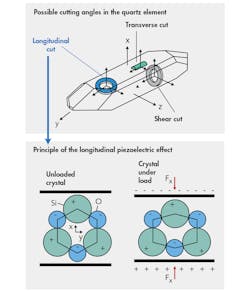
The piezoelectric effect is particularly effective with a quartz crystal: When a mechanical load is applied to quartz that has been suitably processed, a charge signal can be generated from it that’s directly proportional to the acting force (Fig. 1). Therefore, in contrast to other technologies, capture of the measurand using the piezoelectric effect doesn’t depend on strain and displacement.
1. Particularly good use can be made of the piezoelectric effect with a quartz crystal. When subject to a mechanical load, it generates a charge signal that's directly proportional to the acting force.
In this case, the dimension of the quartz element merely determines the maximum permitted amplitude for the measurand. It follows that the signal generated by a large sensor is comparable to one from a smaller sensor with the same structure. The downstream amplifier is then used to set the required measuring range, making precise measurements possible across several decades with just one sensor, and with no need to change the mechanical structure.
Kistler, for example, has developed piezoelectric force sensors with an ICP output. In this case, the raw signal is already converted into an output voltage of 5 or 10 V in the sensor.
Due to the extremely high rigidity of the crystal, the measuring deflection is low, usually in the range of several kilonewtons per micrometer, giving the measurement system a high natural frequency. This is a key criterion for highly dynamic processes in particular. Another important factor is that quartz and crystals exhibit no fatigue or long-term effects such as zero point offsets or linearity changes. In some cases, the use of piezoelectric sensors may be limited by charge drift that occurs for physical reasons. Depending on the measurand's amplitude and the design of the measurement technology, quasi-static measurements are nevertheless possible for periods of several minutes or even hours.
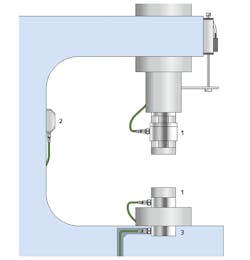
Applying quartz sensor technology developed by Kistler, dynamic forces can be measured both directly and indirectly. Looking at Figure 2, for direct measurements, the sensor is positioned fully in the force flux (1), and it measures the entire force. This approach yields high measurement accuracy that’s virtually independent of the force application point. If the sensor can’t be positioned directly in the force flux, it will only measure part of the force (3); the remainder passes through the structure in which it’s mounted (known as the force shunt). With indirect force measurement, strain sensors are used to measure the process force indirectly via the structural strain (2).
2. Depending on the installation conditions, various sensors are available to provide optimal production monitoring: 1. Direct measurement (the entire process force passes through the sensor). 2. Indirect measurement (a small part of the force passes through the sensor). 3. Shunt measurement (force is measured indirectly via the bending of the C-frame press).
Applications in Research and Industry
In addition to overall economic considerations, installation conditions are becoming increasingly important. Dimensions are often a critical factor in the choice of a force sensor. Quartz sensors are very stable, rugged, and compact. They can often be installed at measuring points where other technologies can’t be used at all. These attributes account for their widespread use not only in research and development, but also increasingly on production lines and in industrial testing technology.
For example, dynamic force measurements that exhibit long-term stability are required for aging and load investigations on automotive components such as pressure, tension, crash, and endurance tests on locks, doors, engine hoods, trunk decks, seats and springs, etc. In this context, quartz force sensors are superior to other sensors because quartz exhibits no signs of aging. Therefore, calibrations can mostly be limited to cycles specified in quality-assurance systems such as DIN EN ISO 9001:2015.
Such advantages save time and money across the board. For certain applications, quartz force sensors offer various technical benefits as well as the advantage of major cost reductions thanks to their lower lifecycle costs.
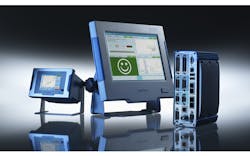
3. The maXYmos XY monitors are able to monitor and evaluate the quality of a product or manufacturing step on the basis of a profile. With the help of evaluation objects (EOs), the user adapts the curve evaluation to the specific monitoring task.
Piezoelectric force sensors are used for dynamic force measurements (e.g., in punching processes for sheet metal parts). In addition, they’re deployed for quasi-static processes such as press-fitting of bearings in engine blocks. In such cases, the process forces can be activated safely. The measurement technology remains undamaged even when force peaks occur that could permanently destroy conventional measurement systems.
Systems developed by Kistler have quality-assurance capabilities for the analysis and documentation of injection-molding processes. Cavity pressure is the most informative process variable, because it describes conditions immediately—while the molded part is actually being created. On the basis of cavity pressure, therefore, sensors and systems can detect at the earliest possible stage whether good parts or rejects are being produced.
System Solutions for Process-Integrated Quality Assurance
In order for data captured by highly sensitive piezo sensors to actually be used, it’s visualized, evaluated, and documented in suitable monitoring systems. When these measuring systems are integrated into the manufacturing sequence, early detection of production defects becomes possible, thereby reducing the potential risk of financial losses due to faulty parts.
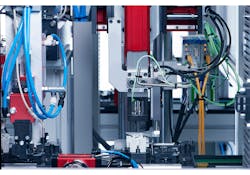
In assembly technology, Kistler's maXYmos system reliably monitors the production processes (Fig. 3). Consequently, production can be optimized toward the goal of zero-defect production with maximum cost efficiency. Features of the system include flexibility and a user-friendly operating interface. It can be used for automated joining and press-fit processes, as well as manual operations like pressing processes carried out by hand (Fig. 4). In addition to production and assembly, applications for Kistler's sensors and XY monitors include verifying the functionality of the end product.
4. Small force sensors are compact and space-saving to optimize integration into the machine design.
Focusing on Enhanced Cost-Effectiveness
Sensor technology based on the piezoelectric principle delivers a remarkable increase in process reliability within a company's production chain, coupled with a sustained improvement in productivity, opening up the way to zero-defect production and maximized process efficiency. From a business point of view, this high-precision technology serves one purpose above all others: It creates a sound basis for economic success in a market where competition is fierce in every part of the world.


