Troubleshoot the Wiring to Your Battery-Cell Test Fixture
Download this article in PDF format.
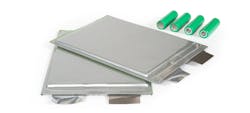
Testing of battery cells is frequently performed on fairly large groups of cells at the same time. Before testing can begin, the cells must be properly connected to the test equipment. For cells in a rigid package, such as a cylindrical or prismatic cell (Fig. 1), the individual cells could be placed one at a time, each into its own cell holder, and the test technician must observe polarity when inserting the cell. Generally, a cell holder is provided by the test-equipment manufacturer; therefore, the wiring from the cell holder back to each single channel of the cell test equipment is guaranteed to be correct and without miswiring errors.
1. Cylindrical cells (upper right) have a hard case, permitting use of pins for electrical contact to the cell during test. Pouch cells (left) have metal tabs, requiring clips or grippers to make electrical contact during test.
For pouch cells with foil tabs (Fig. 1, again), connecting individual cells is typically completed by connecting a test lead via a gripper or clip to the cell terminal. There’s a positive and negative terminal on the pouch cell, requiring the test technician to connect two test leads—one to each terminal.
Since the leads are manually clipped on the pouch-cell terminals, it’s possible that the test technician could inadvertently reverse the leads, putting the negative lead on a positive terminal. This results in what looks to be a cell with negative voltage, which is clearly a reversed cell. Such an error could be hazardous, but most testers would catch this mistake before making internal connections and applying any current.
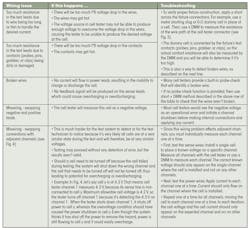
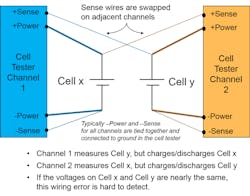
Another possible human error would be to connect the positive test lead of channel x to the positive terminal of cell y. This is much harder for the test system to detect or for the test technician to notice. Why? Because it’s very likely that all cells are at a very similar state during the test and will therefore be at very similar voltages. To learn more, refer to the table.
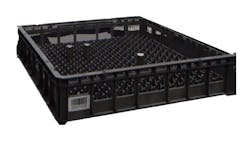
In manufacturing, testing is completed on trays of cells where a tray might contain 25 pouch cells or 96 prismatic cells or even 256 cylindrical cells (Fig. 2). These trays are then loaded into a fixture, where all connections are made with one mechanical action. For a manually loaded system, the fixture could be closed by pulling a lever. For an automated system, the fixture could be closed using pneumatic air pressure.
2. Shown is a tray for cylindrical cells with three cells inside. (Source: Tesla Motors/YouTube)
A benefit of a fixture is that all connections are made simultaneously, removing the tedious and error-prone act of connecting individual cells. Typically, the wiring to the cells is 4-wire type: + power, +sense, - power, - sense (for more information regarding a 4-wire measurement, click here). If the tray of cells contains 256 cells, that means 1024 connections are being made and 1024 wires are running back to the test equipment.
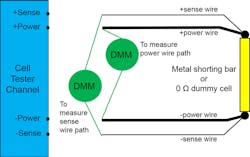
When constructing the fixture, it’s critical to get the wiring correct. The table outlines various problems associated with wiring, the issues this will cause, and how to troubleshoot the issues. For additional information about what problems can occur due to wire and probe problems, click here.
3. Measuring wire path resistance.
4. Miswiring-swapping connections with adjacent channels.
While it can be tedious to troubleshoot a fixture and its wiring, it’s a necessary step to ensure that your cell tester is providing good results and the test setup is safe. Luckily, verifying that a fixture is wired properly only needs to happen when the fixture is first built or when the fixture is repaired or modified.
