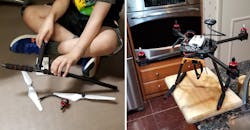
The HoverGames kit arrived the other day in a bunch of boxes. It’s literally a bunch of parts, including nuts and bolts that need to be assembled to make a quadcopter designed for the HoverGames competition. It doesn’t take much time to put the hardware together and you get a good understanding of where everything is and why it’s needed.
Likewise, this drone is designed for experimentation and expansion versus an off-the-shelf drone that would be hard to modify. There are places all over the drone for bolting on cameras, radios, and other sensors, but it already has all of the basics from GPS to radio controls that work with the accompanying ground station.
To help with the project, Iain Galloway, Drone Program Lead for Systems Innovation at NXP, hosts a drone assembly video tutorial:
The tutorial is very good. I watched it with my five-year-old grandson who then helped me assemble the system. I had to handle some of the finer or more difficult assemblies, but he did most of the work. Unfortunately, the mechanical assembly is probably the easiest part of constructing the drone. His programming skills aren’t quite here yet.
The video runs about an hour, but it takes a bit longer to assemble the drone as the magic of video speeds up the process. It can be done easily in an afternoon. Most of the tools are included, although you do need to order at least one lithium-polymer (LiPo) battery. A charger is included. We also wound up with extra nuts and bolts, but that beats coming up short.
Putting the drone together incorrectly is actually difficult—most items only fit in particular spaces or have matching plugs and sockets that only work one way. The exception I forgot about was the drone motors that are paired. One set rotates clockwise and the other counterclockwise. The video does leave out a minor step or two. However, other videos can be used that don’t skip over items like the antenna mount.
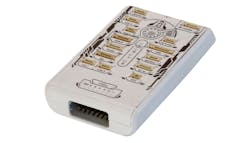
Overall, the HoverGames kit is a joy to work with. I finally did get a battery, so I can move onto the next step that includes programming the flight management unit (FMU), NXP’s RDDRONE-FMUK66, which is built around an NXP Kinetis K66 SoC (see figure). The FMU runs PX4, an open-source autopilot.
NXP’s flight management unit runs the open-source PX4 flight-control software.
So far, I’ve downloaded the latest code, but I still need to reprogram the FMU. I’ve updated the software on the FlySky’s FS-i6s controller that comes with the system. Pairing the FS-i6s with the drone’s receiver is next. The HoverGames website provides useful documentation, but it takes a bit of digging to figure out the software configuration and setup. A complete step-by-step guide like the hardware assembly would be a useful addition.
In the meantime, you will have to wait for my next installment with a completed drone. I just do too much travel these days. I am looking forward to getting the system up in the air so I can see about adding an Intel 3D camera to the mix.
About the Author
William G. Wong
Senior Content Director - Electronic Design and Microwaves & RF
I am Editor of Electronic Design focusing on embedded, software, and systems. As Senior Content Director, I also manage Microwaves & RF and I work with a great team of editors to provide engineers, programmers, developers and technical managers with interesting and useful articles and videos on a regular basis. Check out our free newsletters to see the latest content.
You can send press releases for new products for possible coverage on the website. I am also interested in receiving contributed articles for publishing on our website. Use our template and send to me along with a signed release form.
Check out my blog, AltEmbedded on Electronic Design, as well as his latest articles on this site that are listed below.
You can visit my social media via these links:
- AltEmbedded on Electronic Design
- Bill Wong on Facebook
- @AltEmbedded on Twitter
- Bill Wong on LinkedIn
I earned a Bachelor of Electrical Engineering at the Georgia Institute of Technology and a Masters in Computer Science from Rutgers University. I still do a bit of programming using everything from C and C++ to Rust and Ada/SPARK. I do a bit of PHP programming for Drupal websites. I have posted a few Drupal modules.
I still get a hand on software and electronic hardware. Some of this can be found on our Kit Close-Up video series. You can also see me on many of our TechXchange Talk videos. I am interested in a range of projects from robotics to artificial intelligence.


