Industry 4.0 in Real Time: Data Center Performance on the Factory Floor
What you’ll learn:
● Rugged edge systems enable metrology as an AI-powered, automated quality control mechanism
● The same 100 percent inspection requirement often applied to medical devices can now also be extended to high-end consumer devices—an option that was previously not possible for small, costly electronics
Metrology plays a vital role in manufacturing—the science of measurement applies to products ranging from consumer electronics to critical medical devices and implantable components. Digital transformation is taking center stage in the manufacturing industry, and more advanced automation capabilities redefine how this type of precision object detection and automated inspection can drive safety and quality improvements in an even greater number of important devices.
To achieve this, complex vision algorithms and workload consolidation processes must tap into industrial GPU computing platforms, powerful enough to process complex visual tasks more efficiently than the human eye. Facilitating this level of performance is a computing engineering challenge closely tied to the rugged edge—the rigorous environmental settings that raise the bar on how to implement highly desirable artificial intelligence (AI) and machine learning for a competitive edge. Designed for high performance, deployed systems here must also be built for reliability, reducing costly downtime and delays on the manufacturing line.
Metrology automation fueled by AI
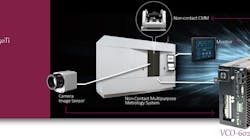
A provider of precision metrology solutions can provide an example of metrology as an AI-powered, automated quality-control mechanism. The firm paired its multi-sensor array with a purpose-built industrial GPU computer, creating an advanced non-contact metrology platform up to 10 times faster than traditional systems. This next-generation system advances legacy metrology capabilities significantly and provides manufacturers an opportunity to improve quality, efficiency, and throughput.
While metrology relates to nearly every kind of part produced on a manufacturing line, many high-volume manufacturing systems only inspect percentages of produced output. A 100 percent inspection is considered unfeasible due to the diverse and complex nature of manufactured parts, coupled with the speedy pace of production common to competitive industrial production facilities.
It’s a careful balance, as the micro-measurements of this sampled group are the basis for certifying the quality of goods like sub-assemblies or smaller components that are eventually integrated into critical systems. Industries can effectively contain production costs with skillful calibration and well-defined process controls, creating less waste and increasing speed, quality control, and ROI. However, when a manufactured good is determined to be flawed, there is a high probability that large numbers of defective, often non-reusable, parts have already passed through the production line.
Machine vision powers smarter, non-contact metrology
In the real-world scenario featured here, the industrial automation company utilizes non-contact metrology methods or machine vision-based systems, powering fast measurements that include complex dimensions down to the micron. This advanced vision and multi-sensor technology operates in contrast to coordinate measuring machines (CMMs), a legacy system traditionally used in measurement applications, and does not require physical handling of products.
Products remain intact as the platform executes high-speed scans without the need for products to be held stiffly to prohibit movement. Using a spectrum of sensors and cameras, as many as 500 parts per second may be scanned in extensive detail. Defects are currently detected via the system’s probes and confocal lenses, and LiDAR technologies are on the horizon as an additional high-speed scanning option. Capturing millions of data points per second, the system analyzes complex, multifaceted geometries down to a millionth of a meter.
For example, Premio’s VCO-6020-1050Ti GPU-based industrial computer with machine vision capabilities provides the computing engine in this system, analyzing and processing data points in real-time. A range of measurements are acquired in sync and the metrology firm’s proprietary software combines the data points to generate the data in one location.
Bringing real-time computing to more settings
Improving metrology matters in an increasingly competitive world of manufacturing, particularly as more and more industrial settings embrace GPU computing and access real-time computing in harsh environments. Restricting measurement to product sampling may no longer be necessary, creating an advantage for products that truly have no room for error. Medical devices, such as implantable therapeutic devices, already require a 100 percent inspection, however this can now be readily extended as an option to costly consumer devices as well – something that was previously not possible for small, costly electronics.
Today, as many as 400-500 critical dimensions can be measured in seconds, a considerable shift and competitive advantage compared to more traditional metrology operations. AI-powered inspection and measurement represents a new level of data value in heavy industrial environments. Through smarter and more efficient real-time data collection, analysis, and delivery back into manufacturing operations, more intelligent decision-making is possible at the rugged edge.

