The Evolving Science of Accuracy in the 21st Century
Members can download this article in PDF format.
What you’ll learn:
- Improvements to the SI are helping to evolve the science of accuracy and measurement.
- Democratization of the SI creates a traceability calibration chain accessible to anyone, anywhere.
- Digitization of the SI is creating a standardized system of expressing instrument specifications and tolerances so that measurement systems can automatically calculate measurement uncertainties and guide metrologists, calibration technicians, and process engineers in choosing the right measurement equipment.
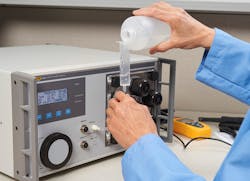
As the oldest science in the world, metrology, or the science of measurement, has had to continually evolve. From the cubit in ancient Egypt to highly precise calibrators today (Fig. 1), the science around measurement and accuracy changes as we continue to learn, and new technology becomes available.
1. The Fluke Calibration 5128A RHapid-Cal Humidity Generator is a high-accuracy portable humidity generator for calibrating probes.
As time and technology have pushed forward, so too has the science of measurement, allowing for better measurements throughout all industries. Better measurement capability improves research, development, and manufacturing, which all lead to better products and improvements in quality of life, like medication, communication, and travel, to list just a few
Metrology & Calibration
While modern metrology can trace some of its roots back to the French Revolution—to 1791, when the meter was defined—the idea and need for standardization flows through our history. And it will continue to flow into our future for technologies to continue to improve.
Technologies, inventions, progress are happening all over the world every single day. However, you can’t continue to advance unless you’re able to measure and control critical parameters.
That’s where two of the most important pieces of metrology come into play. Both accuracy and traceability are critical to understanding the measurement capability of the system and instruments being used.
Accuracy
Accuracy speaks to how correct measurements are. When talking about metrology and measurement sciences, the need for information to be as close to the actual truth as possible is important.
Measurements are subject to many sources of error. Ideally, the goal is always to keep these errors as small and as accurate as possible, but they can’t be reduced to zero.
Measurement and calibration specialists are aware that there’s always uncertainty in measurement. That’s why it’s critical to understand the parameters being measured so that the correct level of measurement capability is used. Instruments with higher precision are usually more expensive, not as rugged, and may require higher-level expertise to use them. Lower-precision instruments may not be good enough for the required measurements and will cause quality problems and mistrust of data.
Many industries follow the 4-to-1 rule where a reference instrument must be 4X more accurate than the specification being evaluated to determine a clear and concise Pass or Fail. Measurement Decision Risk is a term that describes a system of tools and processes for determining the correct specification relationship between the reference measurement device and the device under test (DUT). The DUT term is used in metrology to describe the device or instrument being measured and tested to a tolerance or specification.
Traceability and the Democratization of the SI
Traceability specifies the steps taken to follow a measurement through an unbroken chain of calibrations and reference standards up to the International System of Units (SI). Any tool used for important measurements must have been calibrated by something that’s also been calibrated, and it must have better accuracy capability to ensure the tool is in tolerance. Likewise, that reference standard was calibrated by another, more accurate tool. And so on, until the calibration chain reaches the SI.
The process of being able to follow the calibration paperwork and data up the calibration chain to the SI is traceability. Measurement to a traceable standard helps to verify accuracy on down the line, and thus better ensures that a manufactured part or measurement tool will meet the desired specifications.
We’re so accustomed to traceability requiring measurement through a national metrological institute (NMI) and to the SI whereby it becomes odd to consider that many industry experts don’t think it should be done in such a manner.
A perspective commonly referred to as Democratization of the SI is changing the way people think about traceability and shaping the way for future development in measurement technology. Asking the questions “Why do I need to send my standard to a calibration lab?” and “Why should only a few laboratories be able to make these high-level measurements?” is driving change in the measurement industry.
Lots of time and money is spent sending reference standards out for calibration. Both time and revenue are lost while waiting for the reference standard to come back from calibration. What if the reference standard realizes the SI definition itself and doesn’t need to be sent for calibration—and, therefore, never has to be taken out of service?
Improving the SI
A few years ago, the Bureau International des Poids et Mesures (BIPM) agreed to revise the SI to change the definitions of the remaining artifact-based units to definitions based on unchanging constants of physics. Kelvin and kilogram SI measurements were most impacted by the revisions.
The revisions also helped to support Democratization of the SI. Now every SI unit can be realized in a laboratory that has an instrument using the constants and definitions of the SI (Fig. 2). For example, the kilogram can be realized in a laboratory that uses a Watt Balance and the kelvin can be realized in a laboratory using a Johnson Noise Thermometer.
2. The SI with its defining constants.
With a Watt Balance, measuring mass no longer must hinge off one kilogram. And with the Johnson Noise Thermometer, temperature measurement needn’t be tied to the temperature of the triple-point of water (0.010 °C). In some cases, we don’t have the measurement capability yet with these physics-based instruments, but the groundwork has been laid toward developing instruments that will meet and then exceed capability provided by artifact-based measurements.
This adjustment was a huge turning point in the way we measure the world. We finally replaced technology that, in the case of the kilogram, was established in the 19th century. The kilogram artifact that had been slowly drifting since it arrived in the late 1800s, was throwing off measurements down the calibration chain that were based on it.
Such a level of uncertainty was just something we lived with, up until the changes were made to the SI. This bothered scientists for many years, but no great alternatives surfaced until instruments like the Watt Balance were developed. Other SI units had been moved away from artifacts a long time ago, like the meter moving from a prototype meter artifact to a definition based on the speed of light.
When the 60 countries came together in 2018, they agreed to adopt the new definitions, which opened the SI up to be accessible to more people. No longer are the reference standards locked in vaults and carefully preserved or prone to contamination or other sources of error. Instead, they rely on instruments that use physics and constants of nature.
These new measurement standards can help ensure that laboratories and manufacturing facilities around the world have access to the highest levels of measurement capability. This in turn opens the door for more technology development and improvement of society.
Kilogram
There was only one true kilogram, the fundamental unit of mass—a cylinder of platinum-iridium that lived in a vault at the BIPM outside of Paris. The mass, kept in a famously triple-locked vault, was the definition of the kilogram and referred to as Le Grand K by scientists who were tasked with monitoring it.
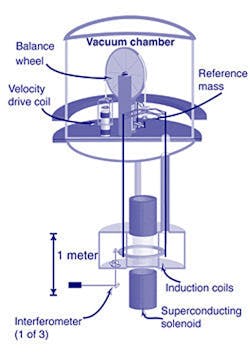
Since 2019, the kilogram definition is based on the Planck constant (Fig. 3). Now any physics equation that has the Planck constant and mass in it could be used as a basis for realizing the kilogram and other values of mass that are needed in industry.
3. This Watt balance diagram shows how the kilogram can be measured using Planck’s constant.
Candela
The candela is the SI unit for the luminous intensity of light. It’s measured in photometry, the science of measuring light. The 2019 changes to the SI adjust the definition of the candela to be more complicated than beforehand, refining the definition but keeping the resulting unit of measure consistent with the previous definition. This helps ensure a one-candela light source will look as bright to the human eye as a wax candle did when the science of measuring light began—it can just be measured incredibly accurately now.
Kelvin
The kelvin is the SI unit for temperature. Before 2019, kelvin was defined based on the triple-point of water temperature, which was realized and measured in a triple-point of water fixed-point cell, or the temperature where all three phases of water exist at the same time: solid, liquid, and gas.
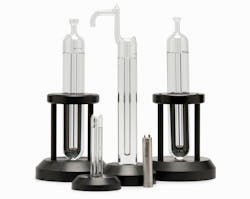
The new SI definition for kelvin is based on the Boltzmann constant (Fig. 4). Now any physics equation that has temperature and the Boltzmann constant in it can become the basis for a way to measure on the true thermodynamic temperature scale.
4. The kelvin was previously based on triple points, like the Fluke Calibration 5901 Triple Point of Water Cells.
Meter
The meter is a particularly interesting member of the SI family because it’s also representative of the human desire for equality. It was a direct result of common people rising up and rejecting the concepts of monarchy and ruling class in the French Revolution. After the revolution, any unit of measure based on a person was removed and replaced with a definition based on science and nature.
The meter was introduced as 1/10,000,000 of the distance between the North Pole and the equator. Other units of measure, such as the liter, the measure of volume, were then based on the meter. And a physical artifact was built, so a platinum meter bar became the standard.
Eventually, as science and technology improved, the meter arrived at its current definition: the distance light travels in a vacuum in 1/299,792,458th of a second. GPS and smartphones are just two examples of many technological advances that have been made possible through the improvements in measuring length and distance.
Second
The measurement of time is another metrology discipline with historical significance. The concepts of hours and minutes date back to ancient times but were uneven lengths due to how they were measured. Though there’s still some debate as to when time began to be measured, it generally originated from astronomy, using devices like sundials to track the progress of the sun through the sky.
Fast forward to the modern world, and the SI base unit for time, a second, is based on the fixed numerical value of a cesium atom’s frequency instead of just a fraction of the day. The newest atomic clock used at NIST has an error of only about one second in 30 million years. And they’re still working on ways to make it even better. These advances have allowed atomic clocks to be available commercially, and precision time measurements have made it possible to develop technology like GPS and fast computing.
Ampere
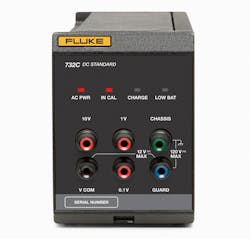
Before the updated SI measurements, the ampere was based on a hypothetical situation with infinite length conductors in a vacuum. Ampere was difficult to define, and other attempts were made over the many years of measuring current to put together a better definition. This is especially important considering so many other electrical measurements are derived from ampere, such as electrical charge coulomb (ampere-second), volt (joule per coulomb), resistance (volt per ampere), and others (Fig. 5). So, in 2019 the ampere was redefined and is now based on a defined number of electrons moving past a point over one second of time.
5. The Fluke Calibration 732C DC Voltage Reference Standard is based off the ampere standard.
Mole
The mole is a unique SI unit because it’s a unit for indicating the quantity of anything that exists in a large number, such as atoms, molecules, and subatomic particles. It was added to the SI in 1971 and is very important in chemistry.
The new SI definition adjusts the mole to be a fixed numerical value of the Avogadro constant. That means one mole of a substance is 6.02214076 × 10²³ elementary entities of that substance.
Where is the Science of Measurement and Accuracy Going?
With these changes to the SI, scientists have reached a point where the original goal of the BIPM has been realized: a standardized measurement system that’s available to all people always. However, each discipline within the science of measurement, has, and will, evolve in their own way based on these constants of nature and the technology available at the time.
Many metrology disciplines practiced today didn’t even exist until more recently, and new disciplines will likely continue to develop as scientists continue to learn and discover more. Temperature, pressure, flow, and electric metrology have all evolved in different ways, and will continue to pull in the latest technology as they move into the future.
Metrology and the evolution of accuracy is a constantly changing science combining the centuries-old principles that created the foundation of metrology with the new, fusing the two together. Those initial principles will remain a part of how things are done. However, the rest will continue to change in relation to them.
The evolution has already been working toward smaller electronics, enabling more power to fit into the palm of your hand than ever before. The anecdote that our cell phones hold more processing power than the computers on the space shuttle puts that into perspective very clearly. Without metrology and the exact measurement accuracy needed, the components wouldn’t be able to fit into a cell phone so precisely.
Digitization of the SI
As we continue forward, there’s a strong push toward digitization and automation. Many calibration certificates are already in the process of being digitized to allow for seamless transmission of certificates into automated systems that need machine-readable data inputs. Hopefully, soon, there won’t be filing cabinets full of paper calibration certificates requiring a human to enter their information into a computer.
These steps will lead toward more reliable traceability and more reliable measuring systems in general. It also creates more opportunities for artificial-intelligence (AI) systems to monitor measurement systems to detect trends and issues to help metrologists and engineers make better decisions.
Fortunately, this is an international endeavor. Thus, standards and definitions are being developed so that everyone can seamlessly send calibration information without any additional translation or manual data entry needed. This endeavor is being referred to as the Digitization of the SI.
Another part of the Digitization of the SI is creating a standardized system of expressing instrument specifications and tolerances so that measurement systems can automatically calculate measurement uncertainties. This will help metrologists, calibration technicians, and process engineers choose the right measurement equipment.
It’s important and exciting to understand that every new technology and development in science is based on the ability to make better and more precise measurements, enabling us to better observe principles of science and take advantage of the constants of nature that make up the universe. It’s safe to say that the entire future of metrology doesn’t look like anything we know today, or from our past.
About the Author
Michael Coleman
Director of Temperature Metrology, Fluke Calibration
Mike Coleman, Director of Temperature Metrology at Fluke Calibration, has more than two decades of experience with temperature metrology. Throughout his career, he’s worked in two of Fluke Calibration’s laboratories: the Temperature Calibration Service Department and the Primary Temperature Calibration Laboratory.
