National Instruments' (NI) $1999 NI LabVIEW Robot Starter Kit for Prototyping is a robotic hardware and software package. It is based on a Single Board RIO (SBRIO) system (see LabView 2010 and Single Board RIO) that is compatible with NI's CompactRIO. It is programmed using NI's LabVIEW (see LabView 2010 Hits NI Week) and comes with a 180-day evaluation version of LabView.
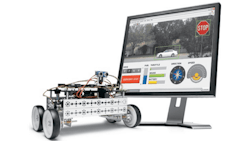
I have had a chance to work with the kit for a little while but just enough to get a general feel for the robot's (Fig. 1) capabilities. I am hoping to work with it a bit more and get past the usual tutorials but it is going to take awhile. The functionality that the system provides is extensive.

The Starter Kit includes NI LabVIEW Robotics Module software that is also available separately. This module is designed to augment autonomous robot design on a range of platforms. It includes sample applications but the key to the Robotics Module is the collection of virtual instruments (VI) for existing robotic related sensors and devices. I'll be covering the module in more detail later in the article.
As noted, the hardware is based around the SBRIO platform. It sits atop a prebuilt robotics engine based (Fig. 2) on hardware from Pitsco Education. The actual parts used by National Instruments come from the Pitsco Education TETRIX system. This is the same one used by FIRST Robotics for the FIRST Tech Challenge (FTC) that is a mid-level robotics competition targeted toward high-school aged students. The big difference between the NI kit and the one used by FTC is that the heart of the FTC kit is the Lego NXT brick that also comes with the Lego Mindstorms (see Real Robots: Lego Mindstorm NXT). It is possible to program the ARM-based NXT using LabVIEW via the LabVIEW Add-ons for LEGO MINDSTORMS NXT but the NXT pales in comparison to the computing and interface power of SBRIO. Applications that would overwhelm the NXT are often trivial for SBRIO that sports more memory, a more powerful processor and an FPGA to tie everthing together.

The robot is built from the following major components:
- National Instruments sbRIO-9631
- Pitsco Education 12 VDC motors featuring 152 rpm and 300 oz-in. of torque
- Pitsco Education TETRIX 4 in. wheels
- Optical quadrature encoders with 400 pulses per revolution
- PING))) ultrasonic distance sensor for distance measurements between 2 cm and 3 m
- PING))) mounting bracket for a 180-degree sweep of the environment
The PING))) is a simple distance sensor that is mounted on a servo. It provides basic obstacle avoidance but most developers will likely be replacing or augmenting this with something more sophisticated. National Instruments vision support (see CompactRIO And Single Board RIO Get Vision) is a natural choice that also works with NI's Smart Camera (see Smart Camera Runs Graphical Applications). A number of projects have tacked on NI's camera to the robot (see Teleoperate the Starter Kit from 20 floors away).
The TETRIX hardware is a heavier duty component system similar to Erector Sets created by A. C. Gilbert almost a century ago. Erector sets are still used for robotics projects but the TETRIX hardware provides more support for heavy duty motors and other robotic-related devices.
The advantage of the TETRIX approach is twofold. First, it provides a source for additional compatible components. Second, it makes incremental improvement of the robot easy. Both are extremely useful characteristics for robotic development work.
The sbRIO-9631 is the heart of the system and why it is from National Instruments. The SBRIO board has the following features:
- Integrated real-time controller, reconfigurable FPGA, and I/O on a single board
- 1M gate Xilinx Spartan FPGA
- 266 MHz Freescale real-time processor
- 64 Mbytes DRAM
- 128 Mbytes nonvolatile flash storage
- RS232 serial port
- 110x 3.3 V (5 V tolerant/TTL compatible) digital I/O lines
- 32x single-ended/16 differential 16-bit analog input channels at 250 kS/s
- 4x 16-bit analog output channels at 100 kS/s
- 10/100BASE-TX Ethernet port
- Low power consumption with single 19 to 30 VDC power supply input
The robot itself weighs in at a hefty 8.5 pounds. Its rectangular layout (15.5in by 9-in) is due to the size of the sbRIO-9631. The battery is mounted under the carrage lowering the center of gravity. The battery delives about a 1 hour runtime using motors and 4 hours without. Two hours is a reasonable duration if the robot is not moving continuously. It takes 1.7 hours to fully recharge the battery.
The motors and wheels provide a fast, accurate, mobile system. It can climb a pretty steep ramp at full speed that is very quick. The small wheel base limits climbing over even small obstacles but the robot can easily handle most flat surfaces including grass and gravel.
The power connection on the battery is one of the things I did not like about NI's solution. It has a connector that plugs into a cable connected to the SBRIO board. This must be disconnected to plug in the charger. Unfortunately the process is not easy and the charger cannot plug directly into the robot. The kit comes with a very long Ethernet cord but power tends to be more of an issue when testing. Swapping batteries is not possible without taking the robot apart. If I was able to keep the robot (its on loan) then I would do a little rewiring. My only problem with the initial testing was caused by a low battery. Actually, a low battery LED would be a useful addition.
Overall, I really like the SBRIO-based hardware solution. The expansion possibilites are good and it hosts a substantial computing platform. There is plenty here for the software to take advantage of. The main feature lacking for a robotics environment is wireless connectivity. The Ethernet connection is fine for attached programming and it works well for SBRIO environments where a wired network is used but robots really need a wireless solutions. Not surprisingly, WiFi is the one common enhancement for most of the third-party projects that work with the kit.
NI LabVIEW Robotics Module
The robot kit's hardware is not very useful without decent software. This is where the NI LabVIEW Robotics Module comes into play. The hardware can be utilized without resorting to the Robotics Module but a developer will need to do a good bit of work to replicate this support.
The module includes drivers for the motors and sensors that come with the kit. It also has drivers for the following sensors and cameras:
- Hokuyo, SICK, and Velodyne LIDAR
- Sharp infrared sensors
- Garmin, NavCom, and u-blox GPS
- Crossbow, Microstrain, and OceanServer inertial measurement unit (IMU)
- Devantech and MaxSonar sonar sensors
- Devantech compass
- Basler and Axis IP cameras
- Analog cameras with the AF-1501 analog frame grabber from moviMED
Some of these may actually cost more than the kit or module but they provide significantly more information that the Parallax PING))) sensor. One of the main things the software provides is a standard interface for similar devices.
The Project Wizard did a good job of getting me started with new projects although I did start with the tutorial project. The Robotics VI collection is available when developing new applications. The software includes a number of non-sensor-related, robotics VIs as well.
For example, the Graph Map and Occupancy Grid VIs are central to applications that track a robots position. There are VIs for handling positioning transformations in addition to robotic arm control interfaces. The steering VIs provide a range of motor control algorithms. There are even a couple path planning VIs.
Developers should be aware that the software module includes example applications but that it is not a robotics framework. It provides the components that can be used to build a robotic applicatin but developers will need to "wire up" the VIs. The standard interfaces developed by National Instruments within the module make replacement of a sensor or drive system easier but creating an application that provides a selection of devices for a platform is a major job. This is due more to LabVIEW's language design. Still, LabVIEW developers will be very comfortable with this approach and it will be second nature to use the VIs that come with the module.
The challenge arises when trying to take advantage of third party solutions that use the hardware platform where the additional components may differ from the ones available to the user.
Getting Started With The Robotics Kit
The first step is to install LabVIEW and the robotics software. That was easy and the first application presented is one that randomly moved the robot around the lab avoiding obstacles detected by the PING))). The application did a good job moving the robot around as long as it did not back up into an obstacle. The initial application simply detects obstacles, backs up and moves off in a random direction. It does not take advantage of the mapping or occupancy VIs.
I found that augmenting this basic application to take advantage of the other VIs a significant effort. I needed to learn a lot more about the robot module VIs before adding them to the mix. The learning process helps when taking advantage of third party solutions that use these VIs since it is easier to know what to disconnect and how to hook into the VIs.
The LabView Robotics Code Exchange is a source that is accessible from the IDE. There are examples like the NIWeek 2010 Robotics Swarm Demo as well as Robot Recipes like Robot Recipe: Teleoperation Mode for NI Robotics Starter Kit.
Getting the robot running out of the box was an easy task. Trying to build up an application from scratch or using third party apps has proven to take a bit more time. I'll see about writing up more of this experience when I have time.
I'll leave you with a few comments in closing. LabVIEW developers will feel at home with the robot kit and the VIs in the module. This is definitely not a platform for someone new to robotics or LabVIEW to get started with. The problems with the battery and lack of WiFi are issues easily fixed but it would have been nice to pull the robot out of the box and not have to worry abou them. Overall, this is a really nice robotics platform.
About the Author

William G. Wong
Senior Content Director - Electronic Design and Microwaves & RF
I am Editor of Electronic Design focusing on embedded, software, and systems. As Senior Content Director, I also manage Microwaves & RF and I work with a great team of editors to provide engineers, programmers, developers and technical managers with interesting and useful articles and videos on a regular basis. Check out our free newsletters to see the latest content.
You can send press releases for new products for possible coverage on the website. I am also interested in receiving contributed articles for publishing on our website. Use our template and send to me along with a signed release form.
Check out my blog, AltEmbedded on Electronic Design, as well as his latest articles on this site that are listed below.
You can visit my social media via these links:
- AltEmbedded on Electronic Design
- Bill Wong on Facebook
- @AltEmbedded on Twitter
- Bill Wong on LinkedIn
I earned a Bachelor of Electrical Engineering at the Georgia Institute of Technology and a Masters in Computer Science from Rutgers University. I still do a bit of programming using everything from C and C++ to Rust and Ada/SPARK. I do a bit of PHP programming for Drupal websites. I have posted a few Drupal modules.
I still get a hand on software and electronic hardware. Some of this can be found on our Kit Close-Up video series. You can also see me on many of our TechXchange Talk videos. I am interested in a range of projects from robotics to artificial intelligence.
Comment About the Article
To join the conversation, and become an exclusive member of Electronic Design, create an account today!

Leaders relevant to this article: